“Welcome to our L4D2 Mapping Tutorial: L4D Passing Bots Guide! Are you looking to add movement to Bill, Francis, Louis and/or Zoey bots in your maps? Look no further, as this guide will show you how to do just that. You’ll also learn how to easily move them to different locations within your map. Let’s get started!”
Introduction
Also the passing bots only work with L4D2 characters, they will not work if you have set the campaign’s mission file with L4D1 characters. Unless a future update makes the L4D2 passing bots real then its L4D2 characters only for your campaign if you want the L4D passing bots to appear.
Also a quirk is that Louis is the only passing bot able to use the turret machine guns. Rest of the crew will ignore it.
Passing bots are also invincible and both the Special Infected and Infected will ignore them and focus on the L4D2 crew.
L4D Passing bots will all follow the same battlestation so you are unable to split them up to separate battlestations!!!
How to create/Spawn a L4D Passing Bot
The prop_detail is just so the info_l4d1_survivor_spawn can precache the survivor model.
On info_l4d1_survivor_spawn go to character and change it to the survivor you want to spawn. You can have more info_l4d1_survivor_spawn to spawn the rest of the survivors. (Note that you cannot have more then 1 bill, francis, louis and zoey)
Make sure to name the prop_dynamic and the info_l4d1_survivor_spawn so you can input commands in them to make this work.
If you want to know what the prop_detail model names/location of the survivors here it is:
Bill’s model is ” models/survivors/survivor_namvet.mdl “
Francis model is ” models/survivors/survivor_biker.mdl “
Louis model is ” models/survivors/survivor_manager.mdl “
Zoey model is ” models/survivors/survivor_teenangst.mdl “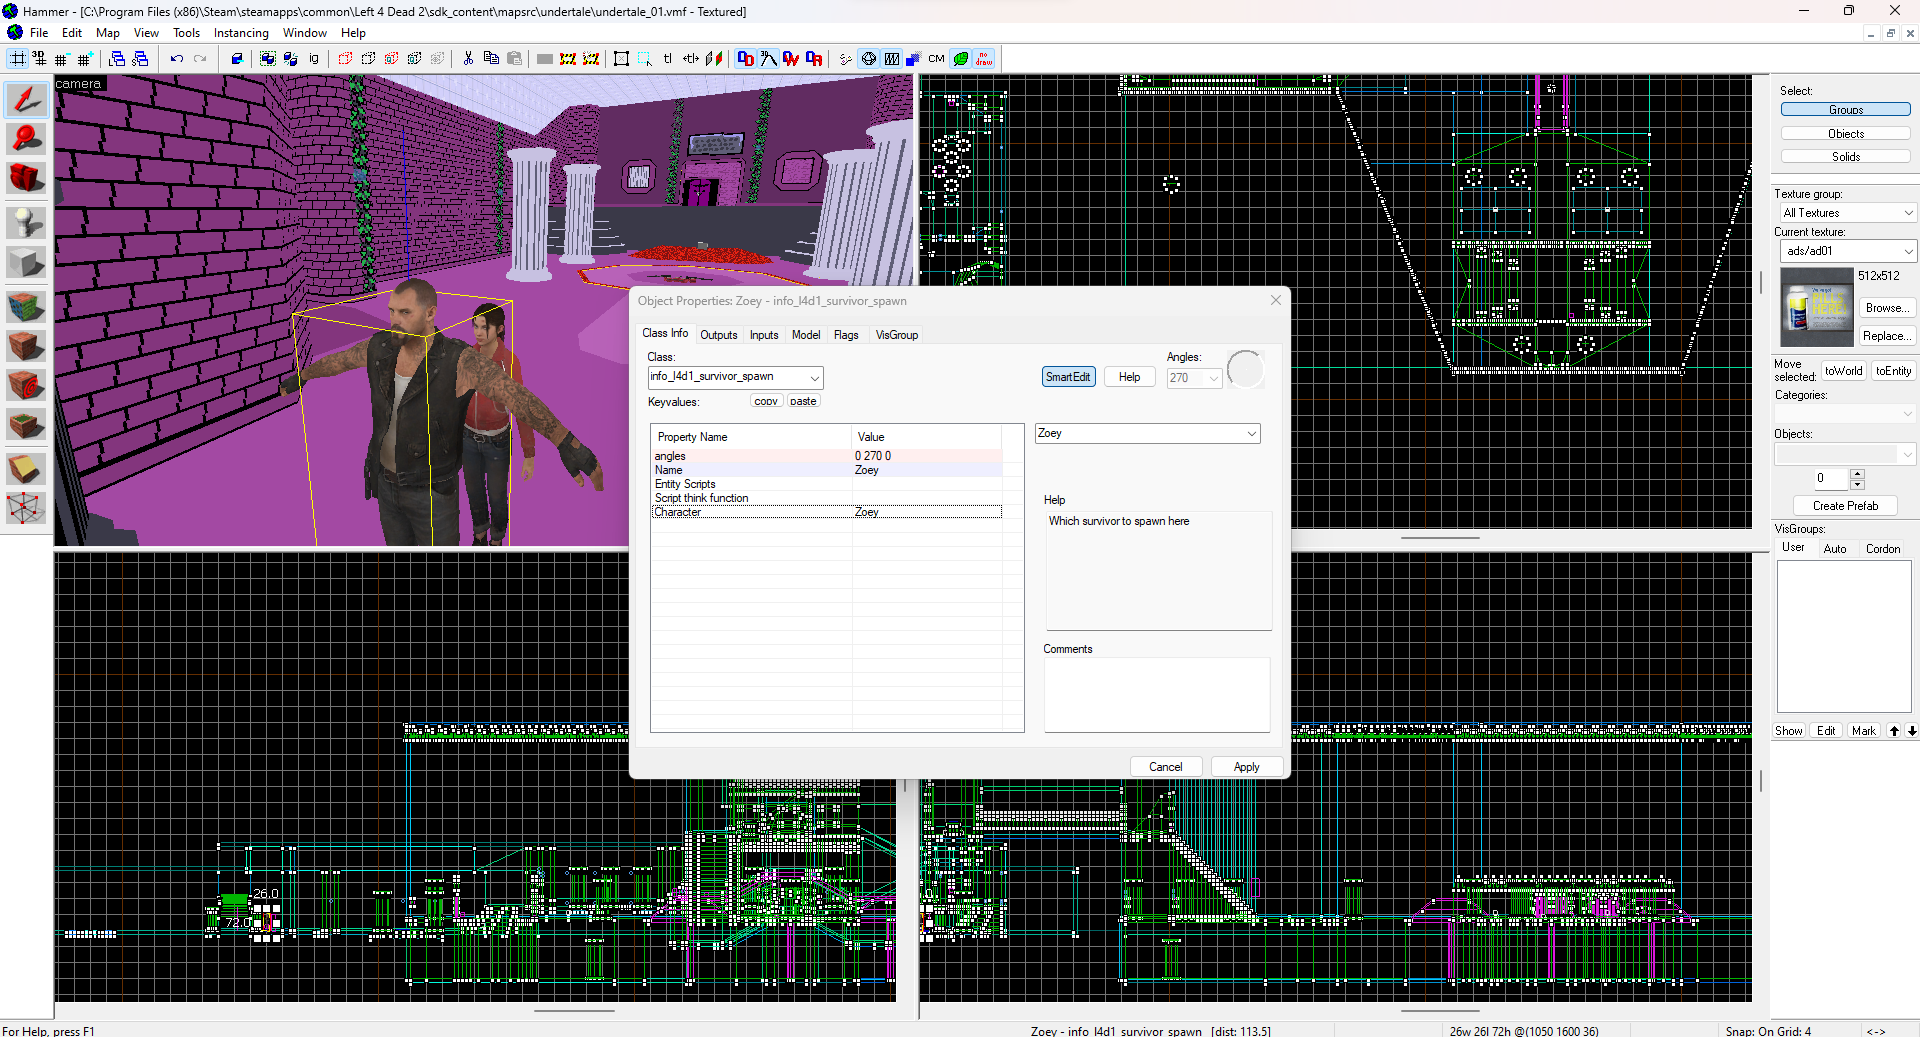
You can keep all of the info_l4d1_survivor_spawn and prop_dynamic names the same IF you are spawning more than 1 L4D passing bot at the same time.
Now to spawn them, on the outputs of your trigger, button, relay etc. Have the “info_l4d1_survivor_spawn” first “SpawnSurvivor” to spawn the L4D passing bot in.
Set after 1 nanosecond after to kill the prop_detail of the survivor.
DO NOT DELETE THE PROP_DYNAMIC AT THE SAME TIME YOU SPAWNSURVIVOR OR IT DOESNT WORK. SET IT LIKE I HAVE IN THE SCREENSHOT WITH THE TIME DELAY.
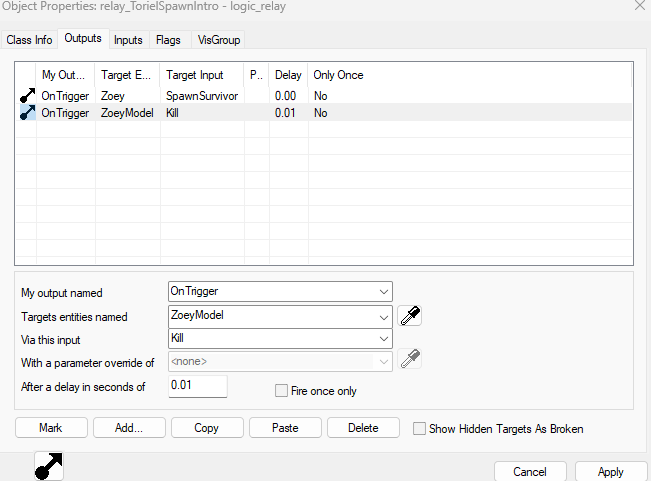
As you can see in the screenshot, that is all you need as a output to spawn a L4D Passing Bot.
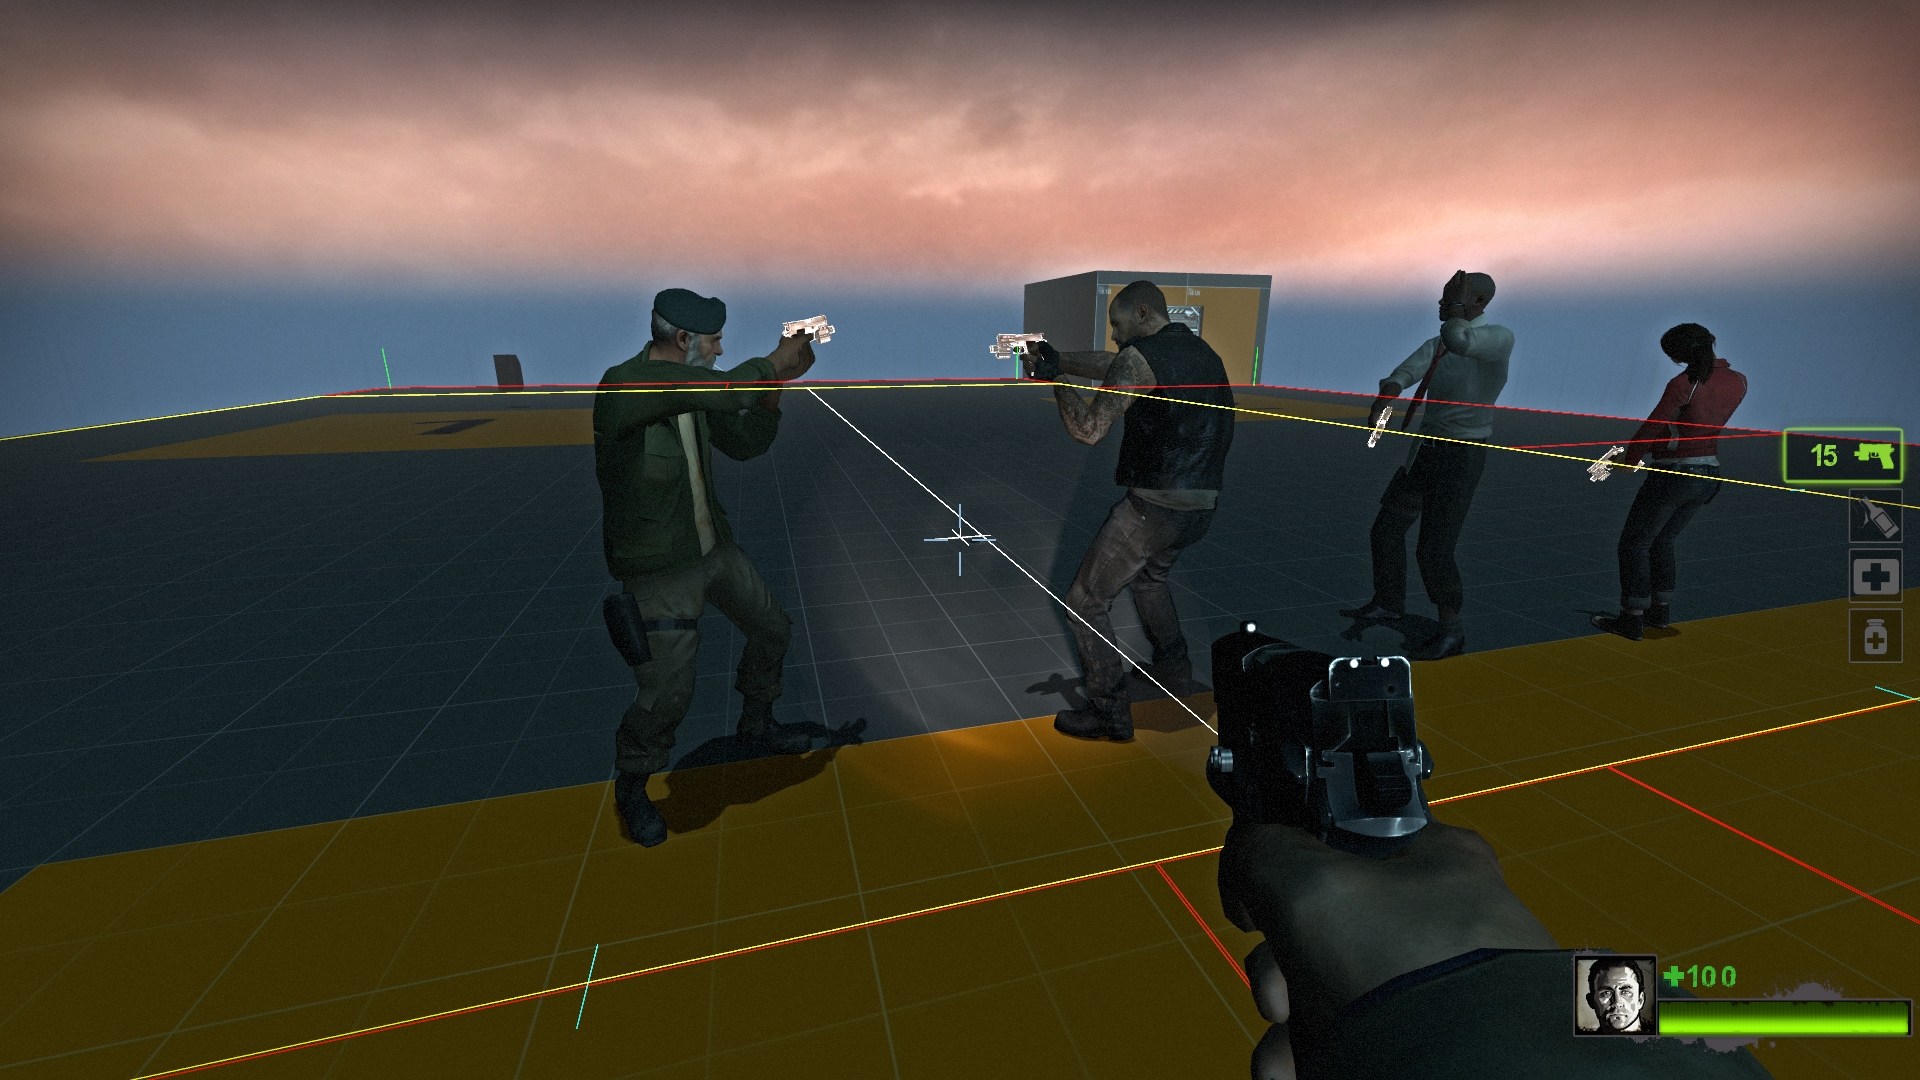
As you can see, they work… but now how can you make them MOVE? Next section will tell you how.
Passing Bot Navigation [PART 0: Setting up the Navigation]
I suggest you FIRST finish your map before doing this as creating new areas or adding props that block the previous navigation that didnt generate with the blocking prop in mind will cause some unintended effects. BUT if you do, read The L4D2 Mapping Valve Wiki on Navigation Modifying to find out how to add new nav areas and connect them to a already existing navigation that has been generated before any new areas, etc.
On your map type on the console “nav_generate” to generate navigation. Make sure to do “nav_edit 1” in console so you can see the navigation areas after you generate.
BTW the L4D Passing Bots love to hang around mostly on the edges of the area then in the middle. Make a very small navigation area boxes to make them stand in the middle and shuffle around.
——————————————————————————————————————————
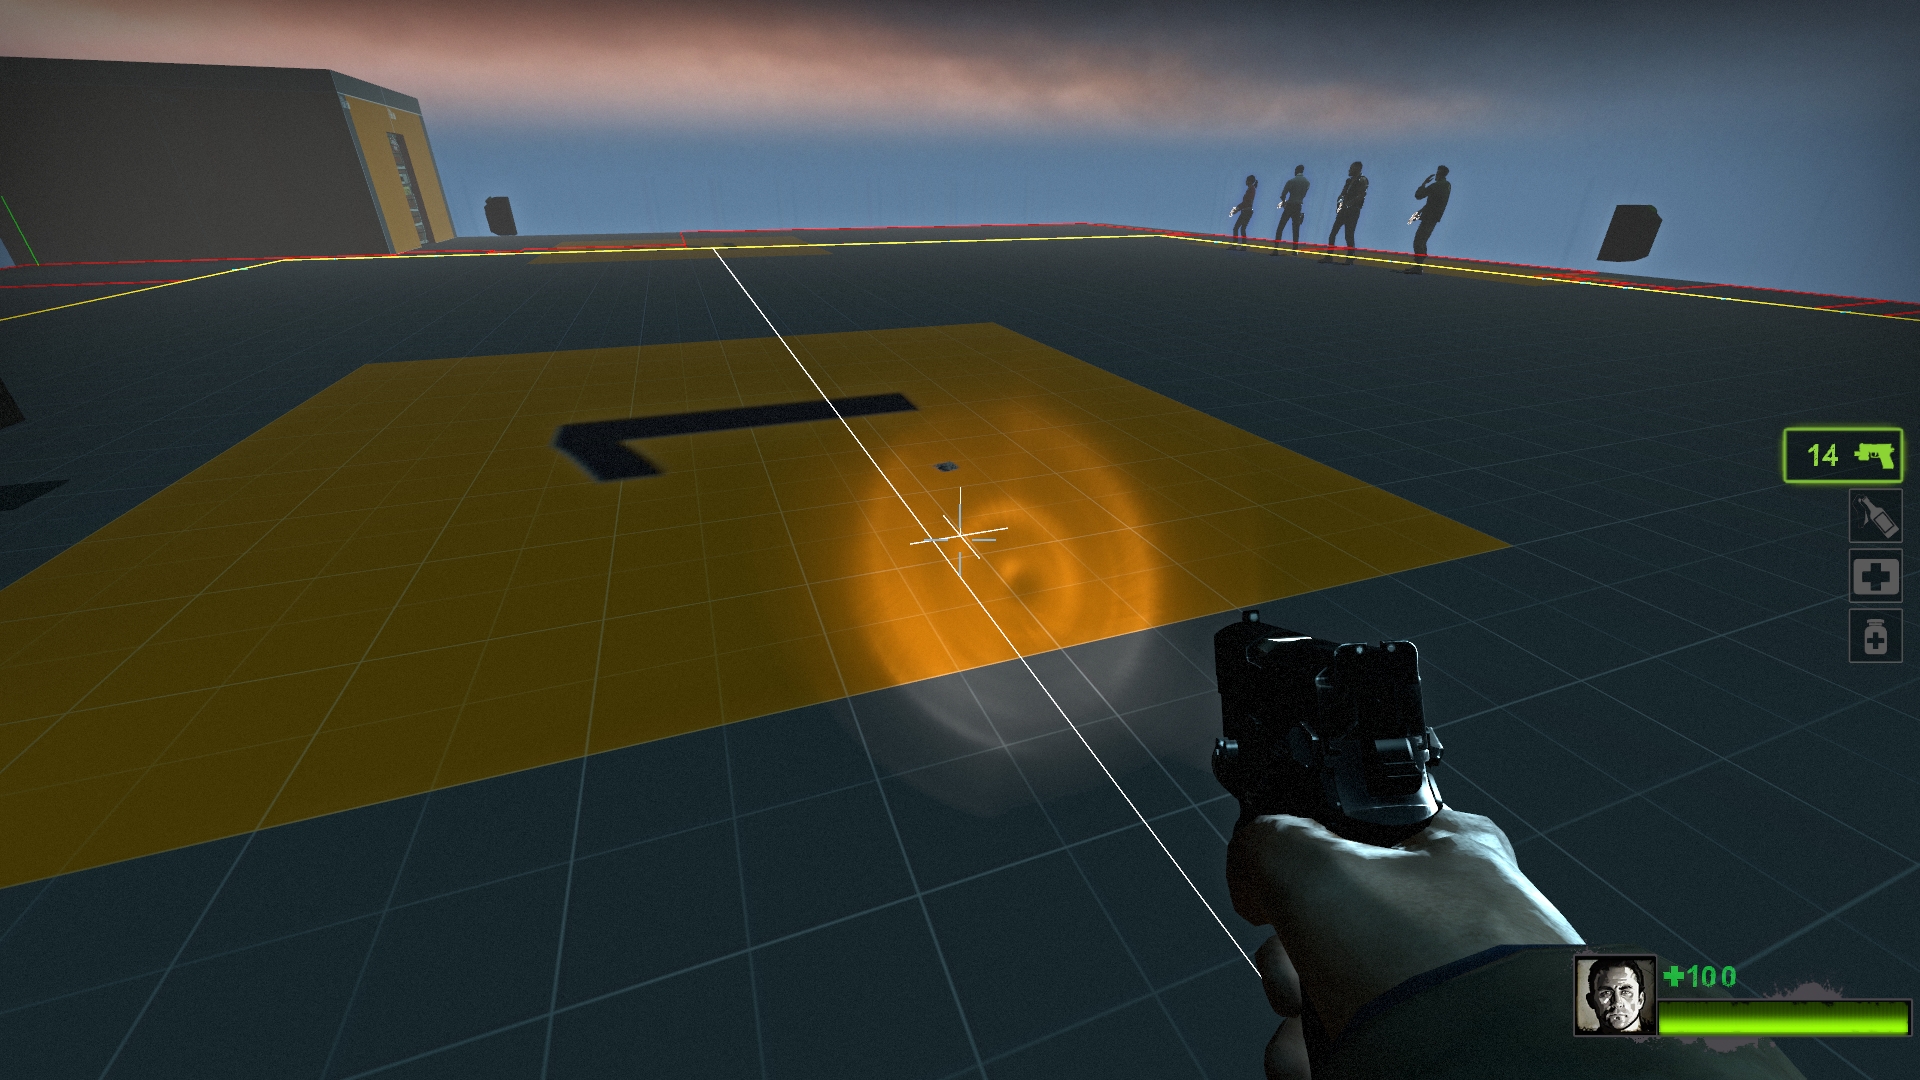
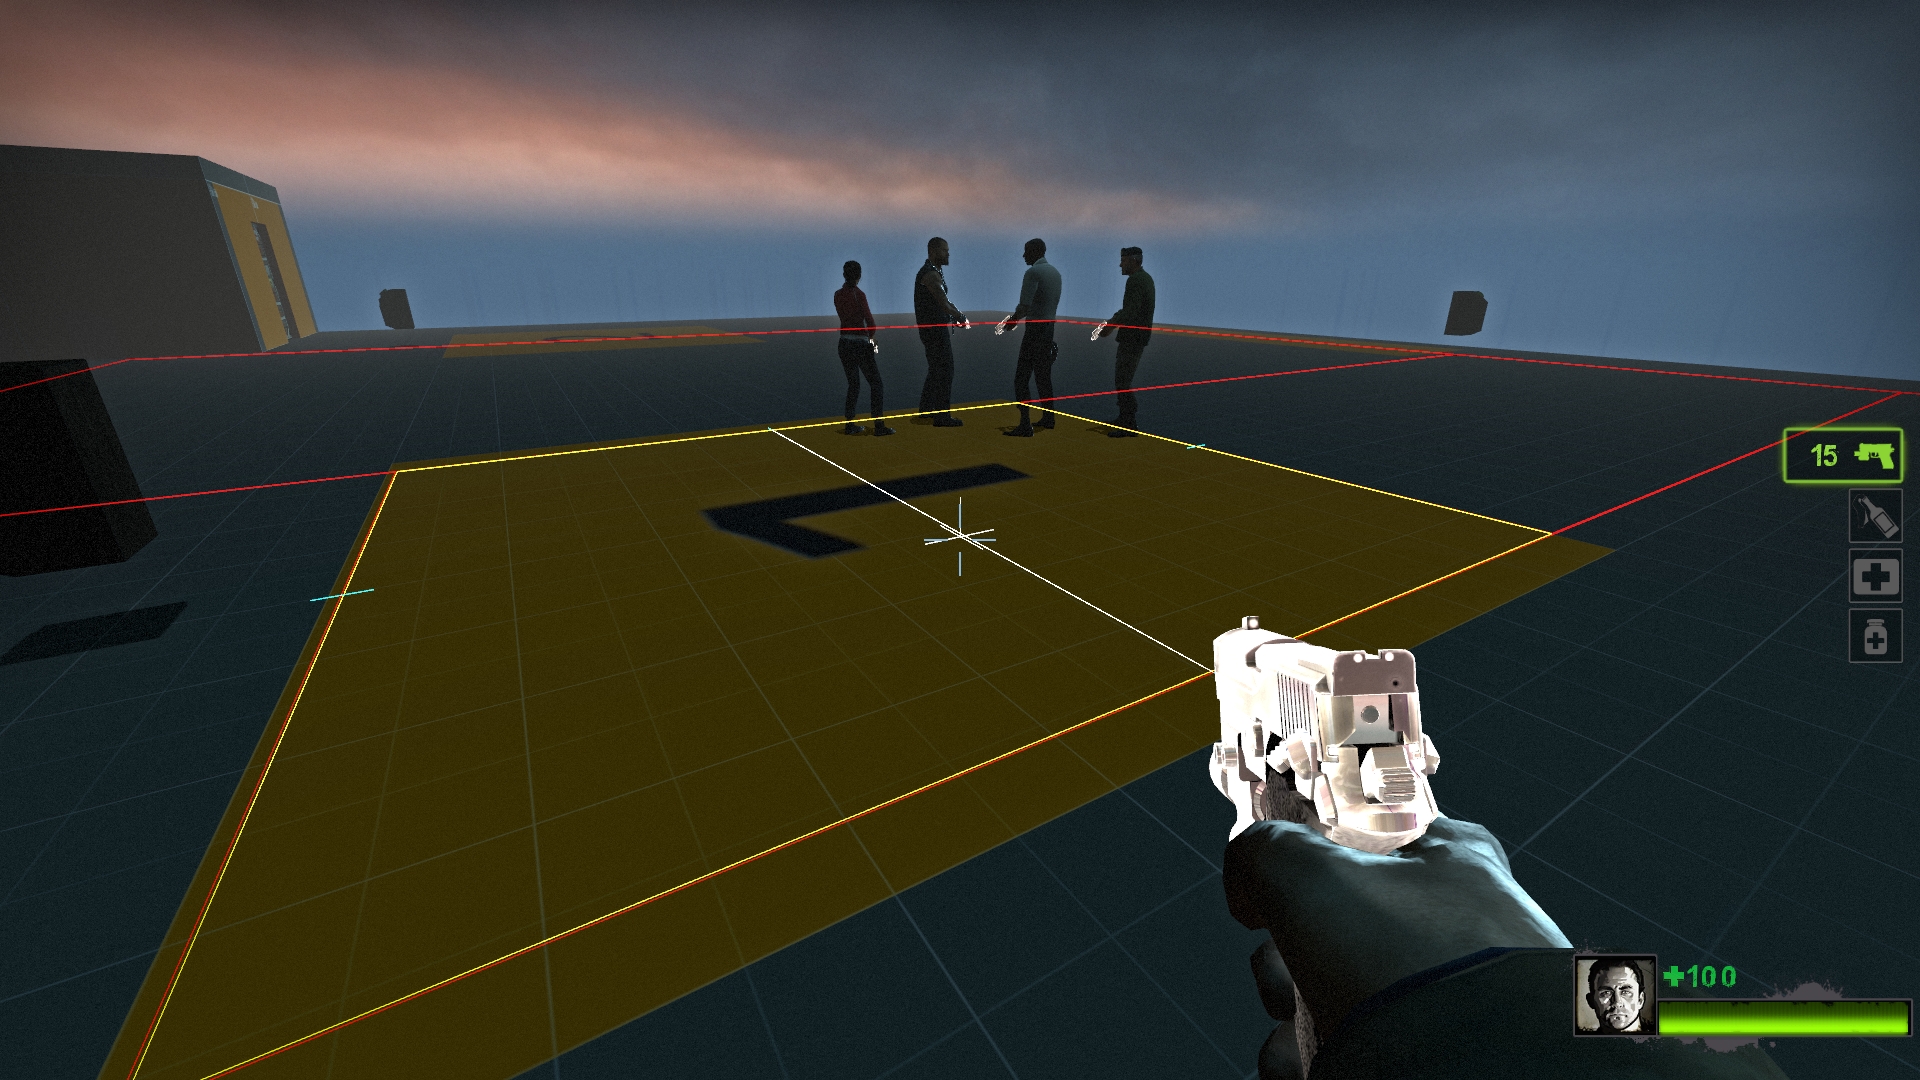
Now: You have generated a navigation and you want to make the L4D passing bots to be in only orange spot with the number “1” as seen below.
 .
.
Problem is, the navigation area is TOO big. As of a result they will NOT go to the orange spot.
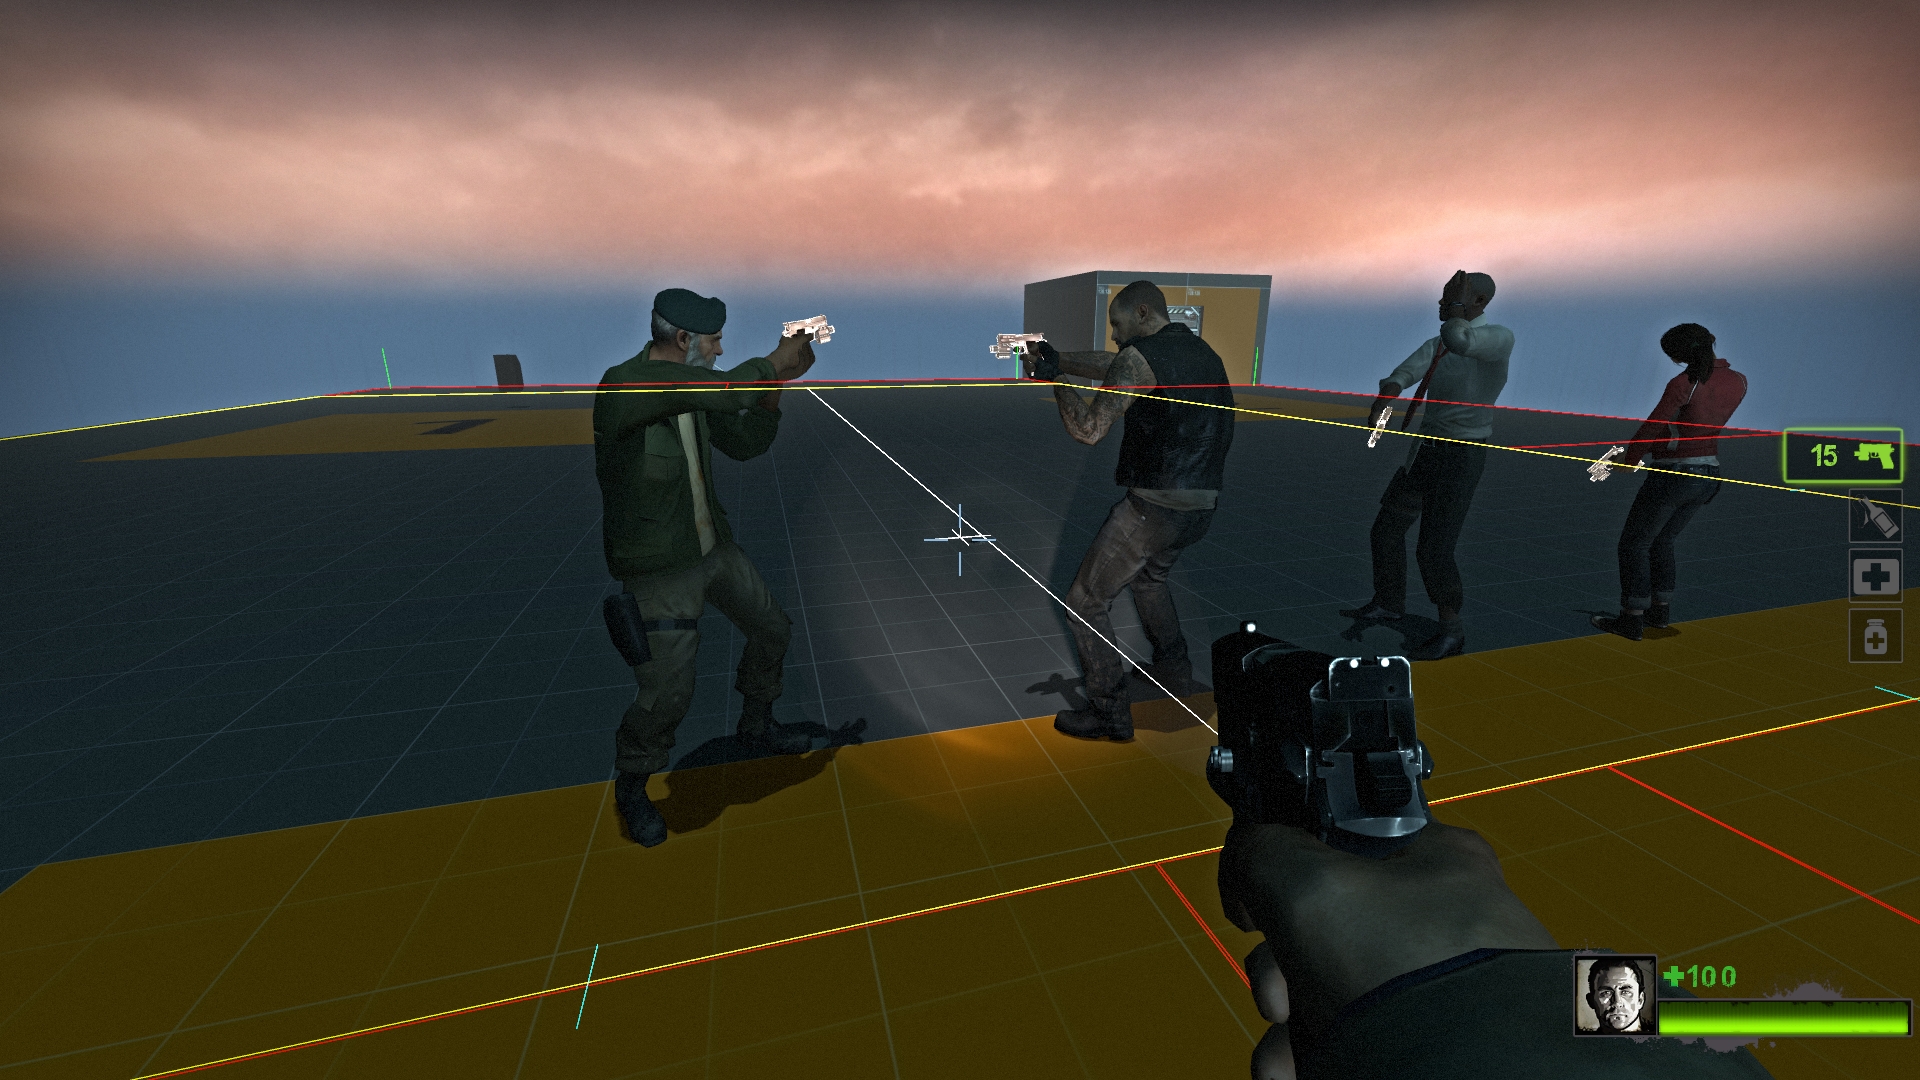
As you can see, the orange spot is in the too big navigation area. The bots do not care about the battlestation trigger but the navigation area the battlestation attribute was applied from instead.
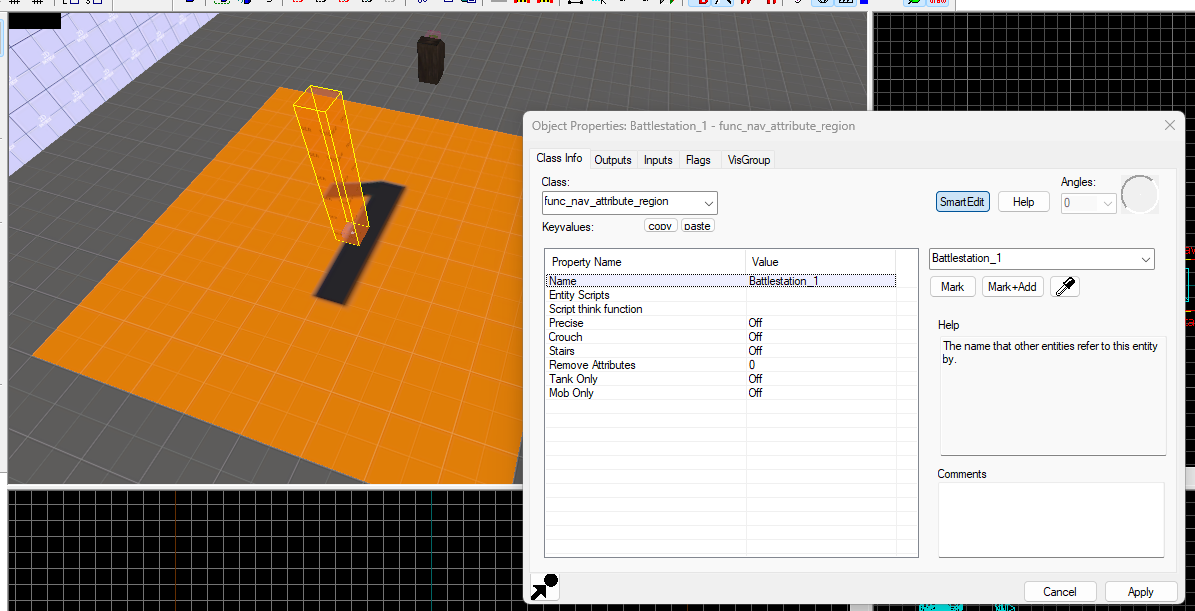
for brainlets, the Battlestation trigger only applies a attribute to the navigation area(s) the trigger is touching depending on the trigger box size.
 .
.
This battlestation trigger is small and only touches one area which is the big navigation area.
(btw, you will have to remove the battlestation attribute if you have applied it before splitting as splitting saves the attributed spots even if you delete the attribute, compile, add the attribute and then recompile. So you will have to go to the areas you dont want the passing bots to be in that was splitted from the big area and remove it. Go back to the wiki and find the attribute deleting command lol)
You may ask now, How do i solve this big navigation area problem?
Simple!
The “nav_split” command will help you in it’s efforts.
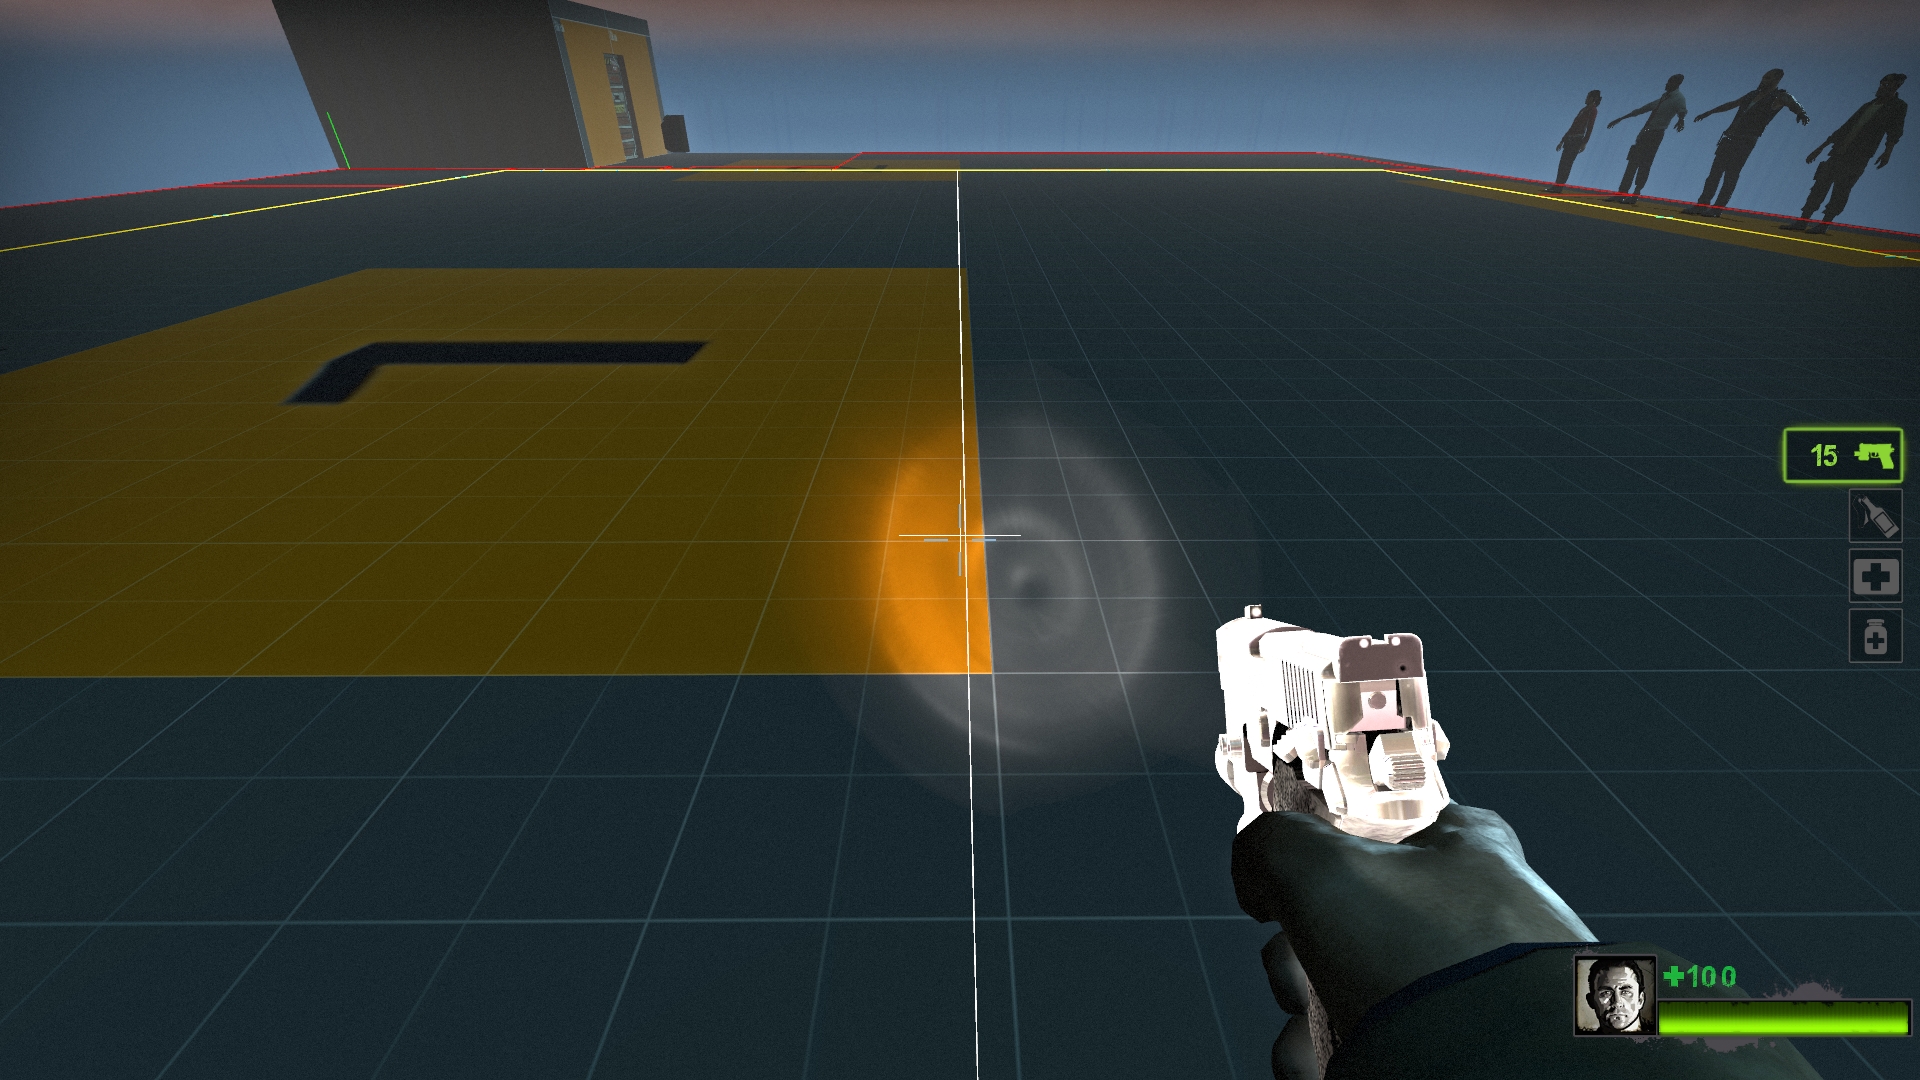
As you may notice with nav_edit 1 on, you will see a bright line where your cursor is. This is where it will split when you type the command.
 .
.
Type “nav_split” in console and press enter.” .
.
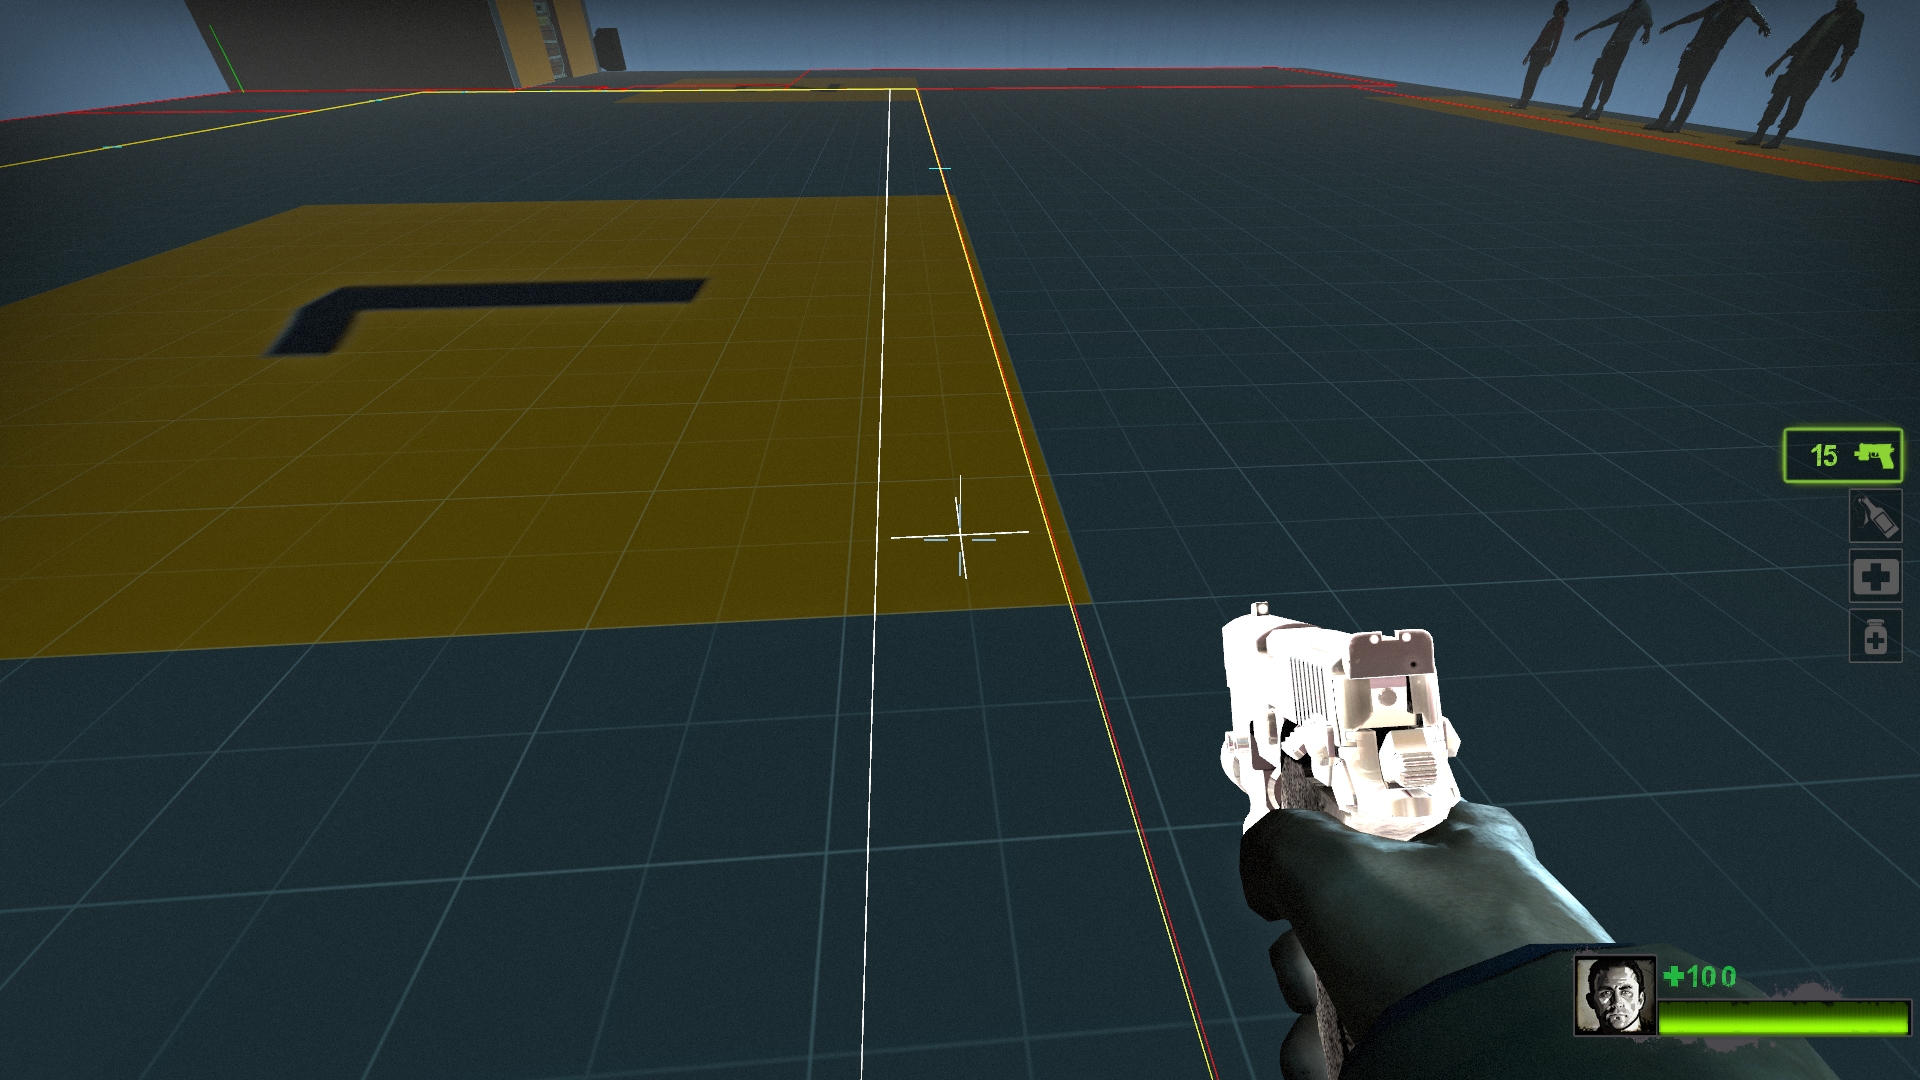
You will now hear the knife slashing noise as you can now check and the area has been separated.
 .
.
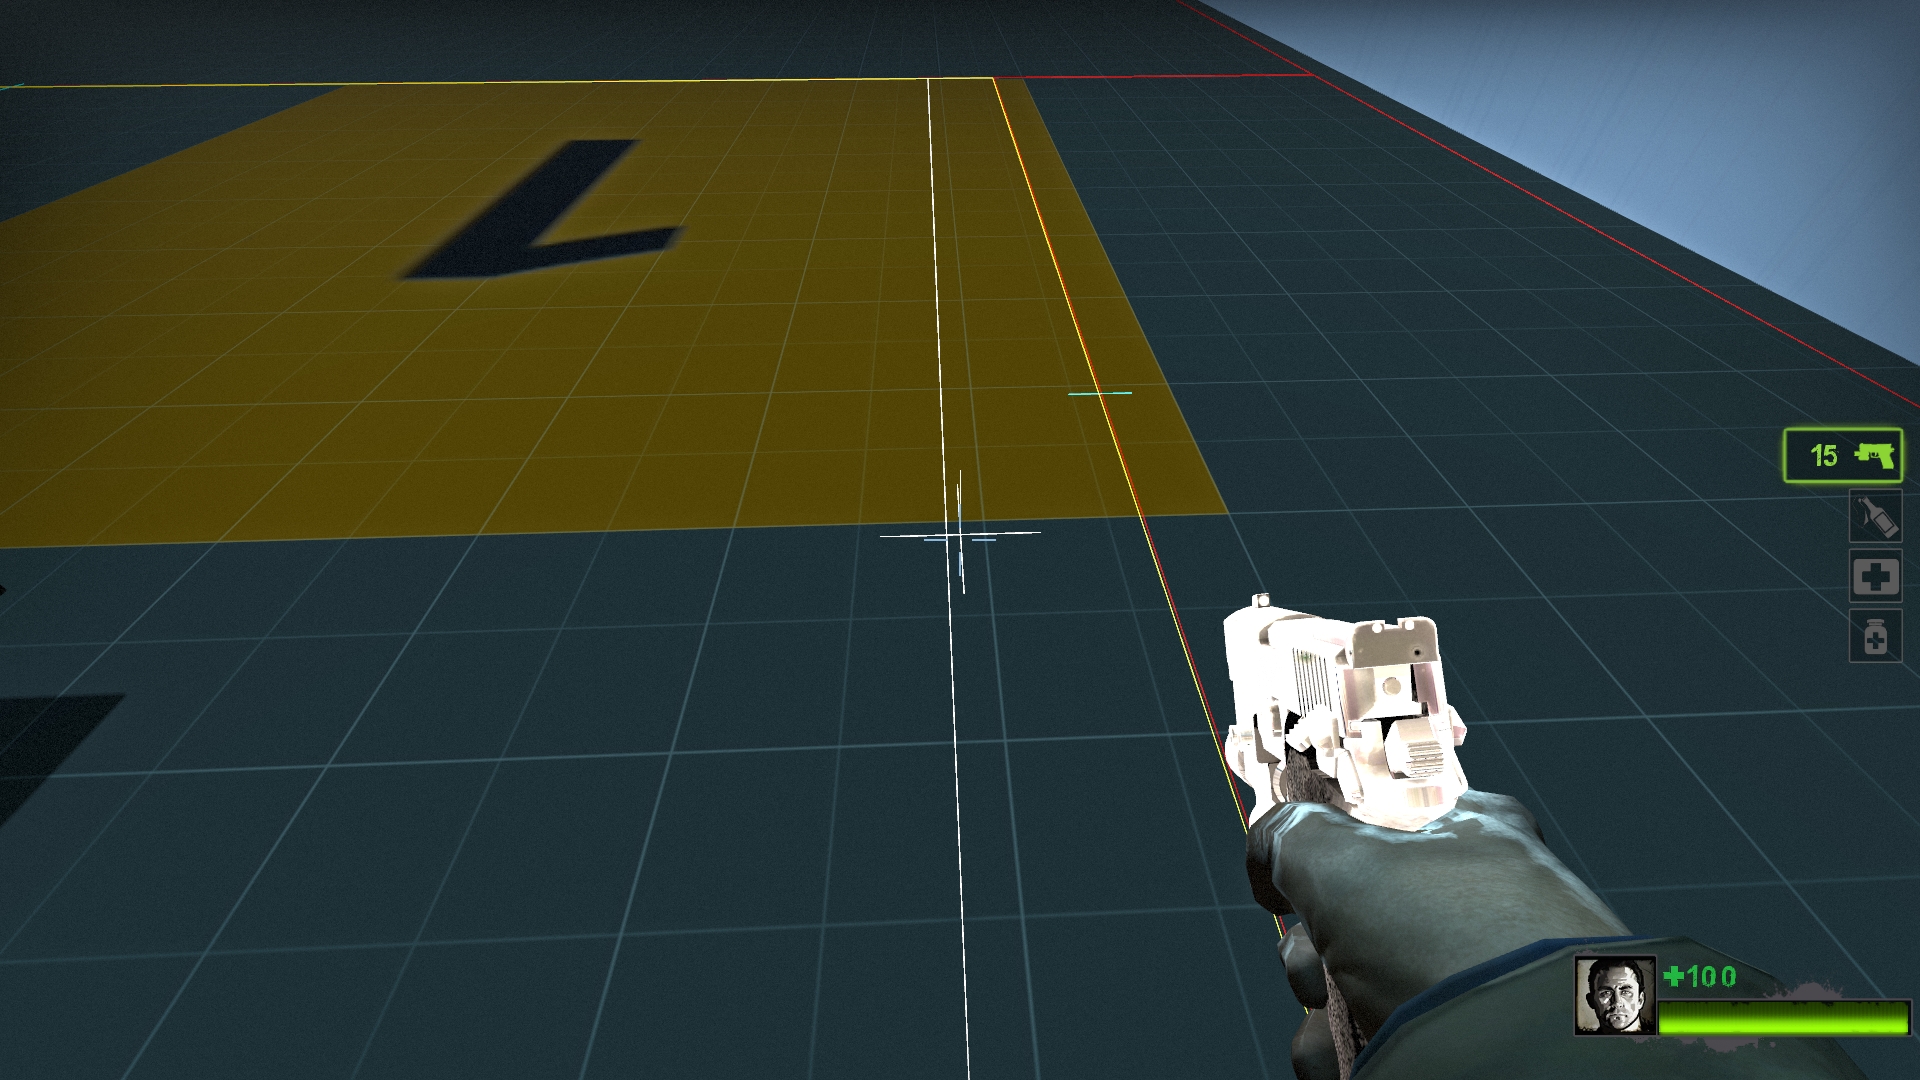
It has been split, but not enough! You can split them from another angle as well as seen below.
 .
.
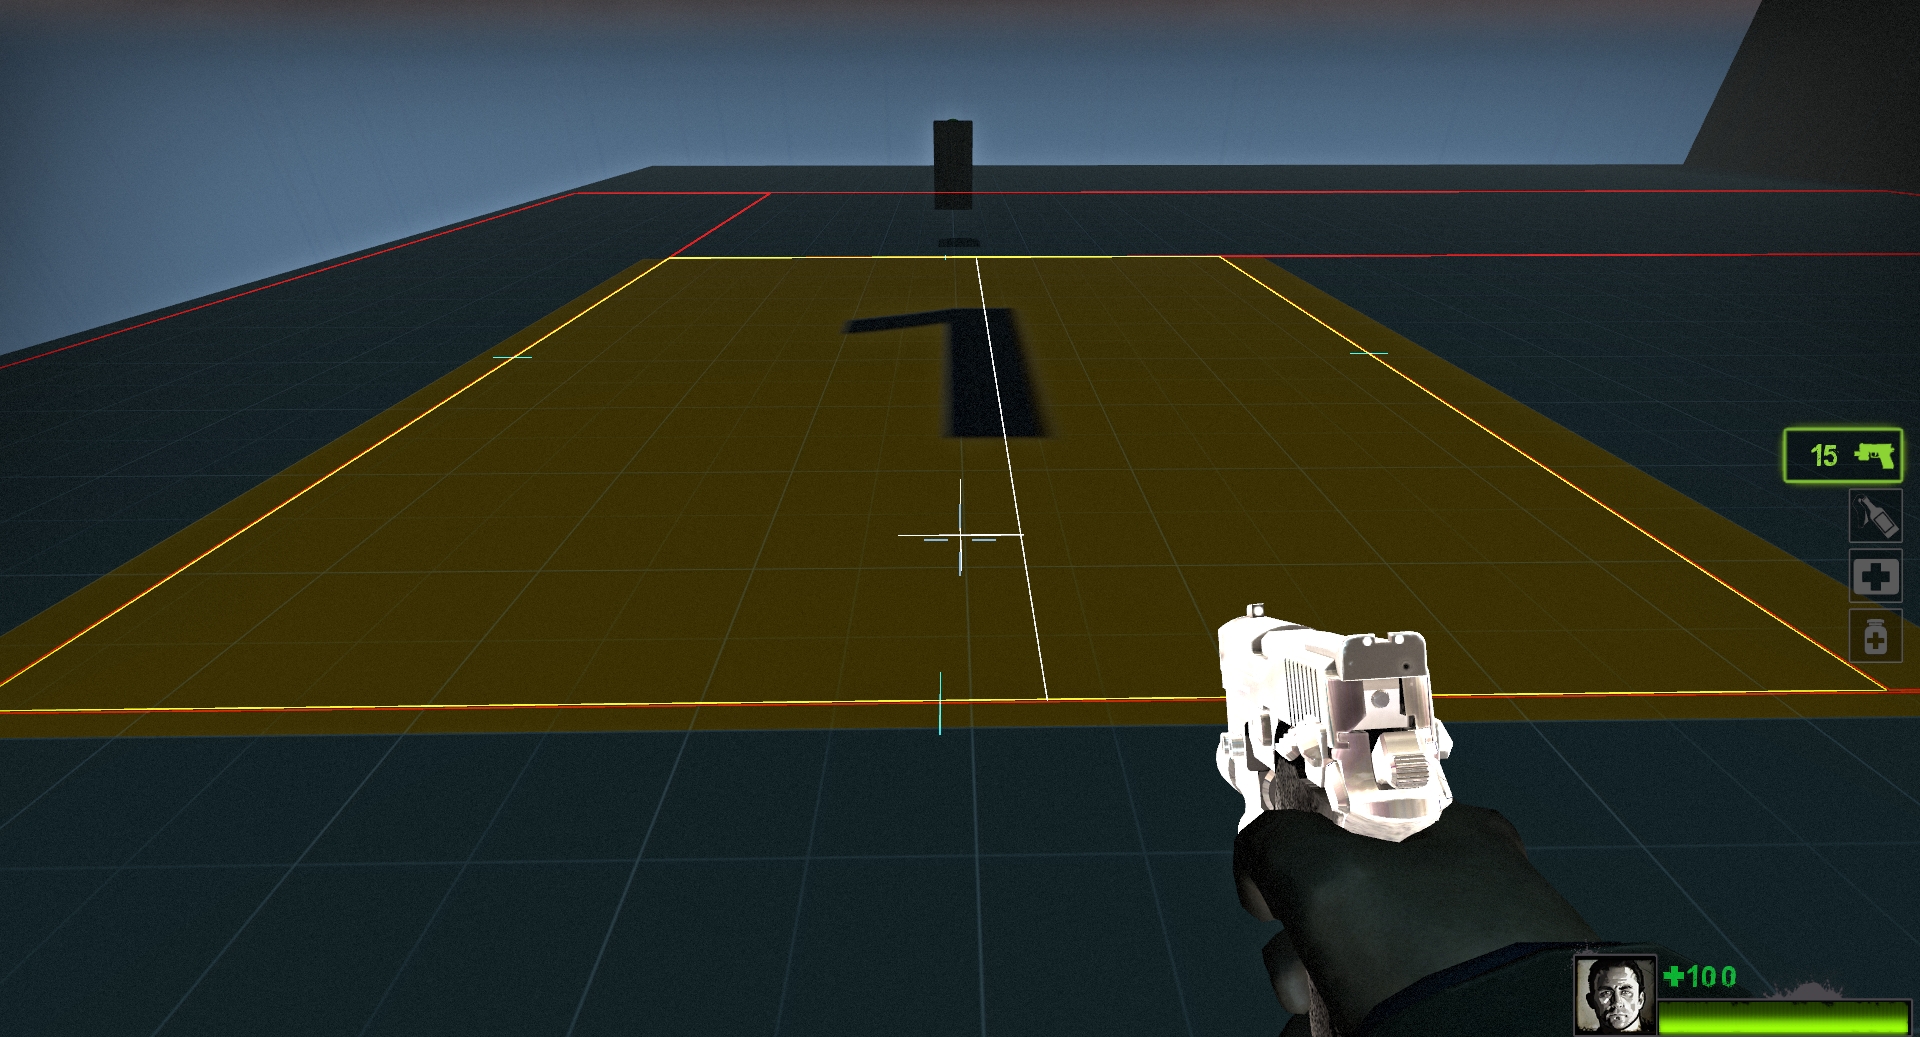
As you can see below, i have sliced the other angles to make a square area where I want the passing bots to go to.
 .
.
NOW TYPE IN CONSOLE “nav_save” TO SAVE CHANGES TO THE NAVIGATION OR IT WONT SAVE!!!!!
 .
.
Ignore the error as the analyse navigation command is only for the director to understand where to spawn the infected. not needed for l4d passing bots!!!
NOW after that you can add in the battlestation trigger and compile the map.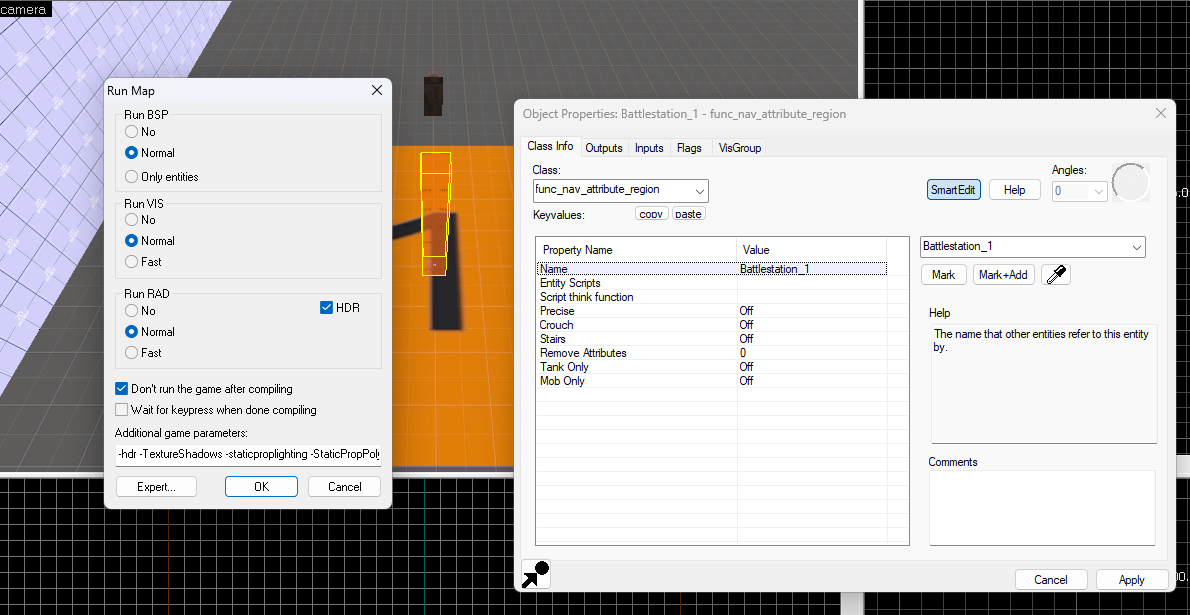 .
.
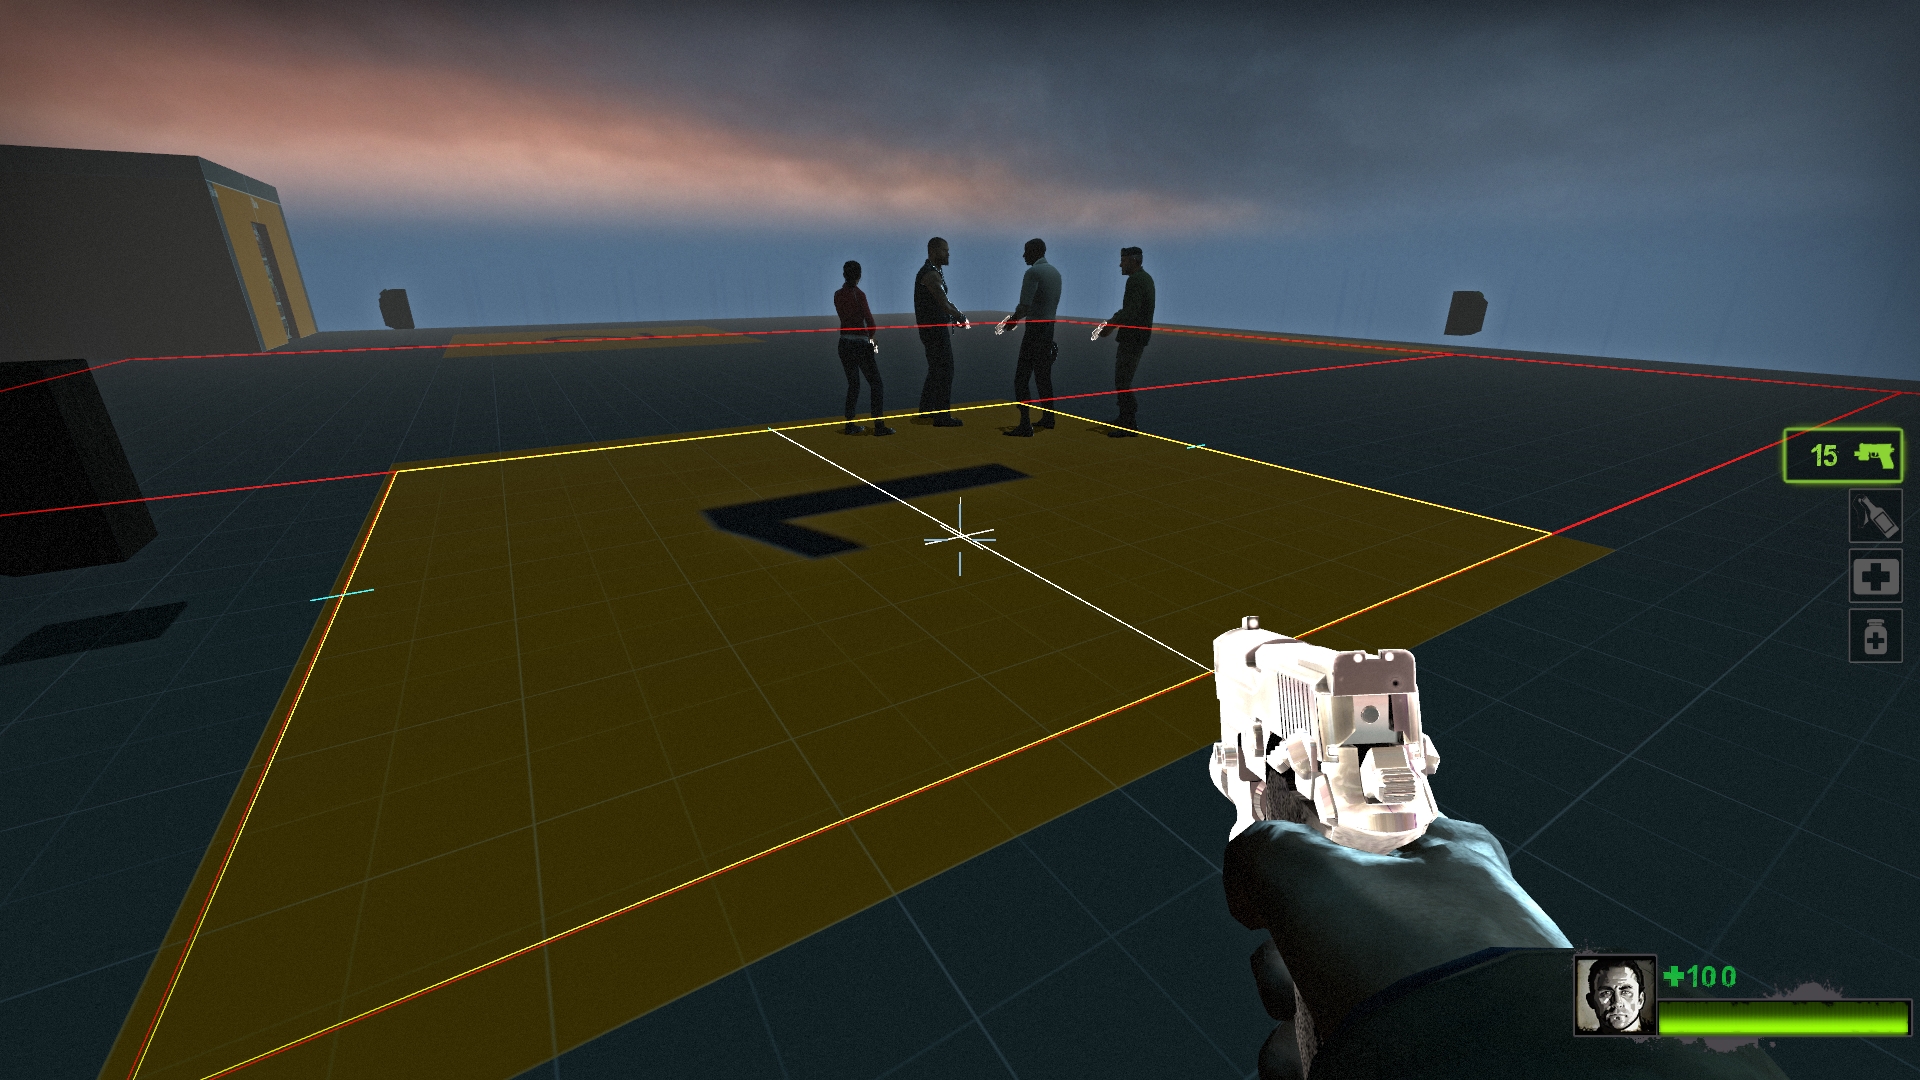
As you can see they are now properly in the area I wanted them to be, like i said before they are very much prefer to be on the edge of the navigation area so split it even smaller for them to be in the center.
 .
.
.
.
.
.
.
HOWEVER, if you have a navigation area(s) that looks like this on your wanted location but you want to merge them into 1 square area for simplfication…
 .
.
Then you will need to know TWO commands to fix this problem!
They are:
nav_mark – Marks a single navigation area your crosshair is touching
nav_merge – After marking one area, hover over another area and type this command
(and nav_save too techically so it is saved into the nav file)
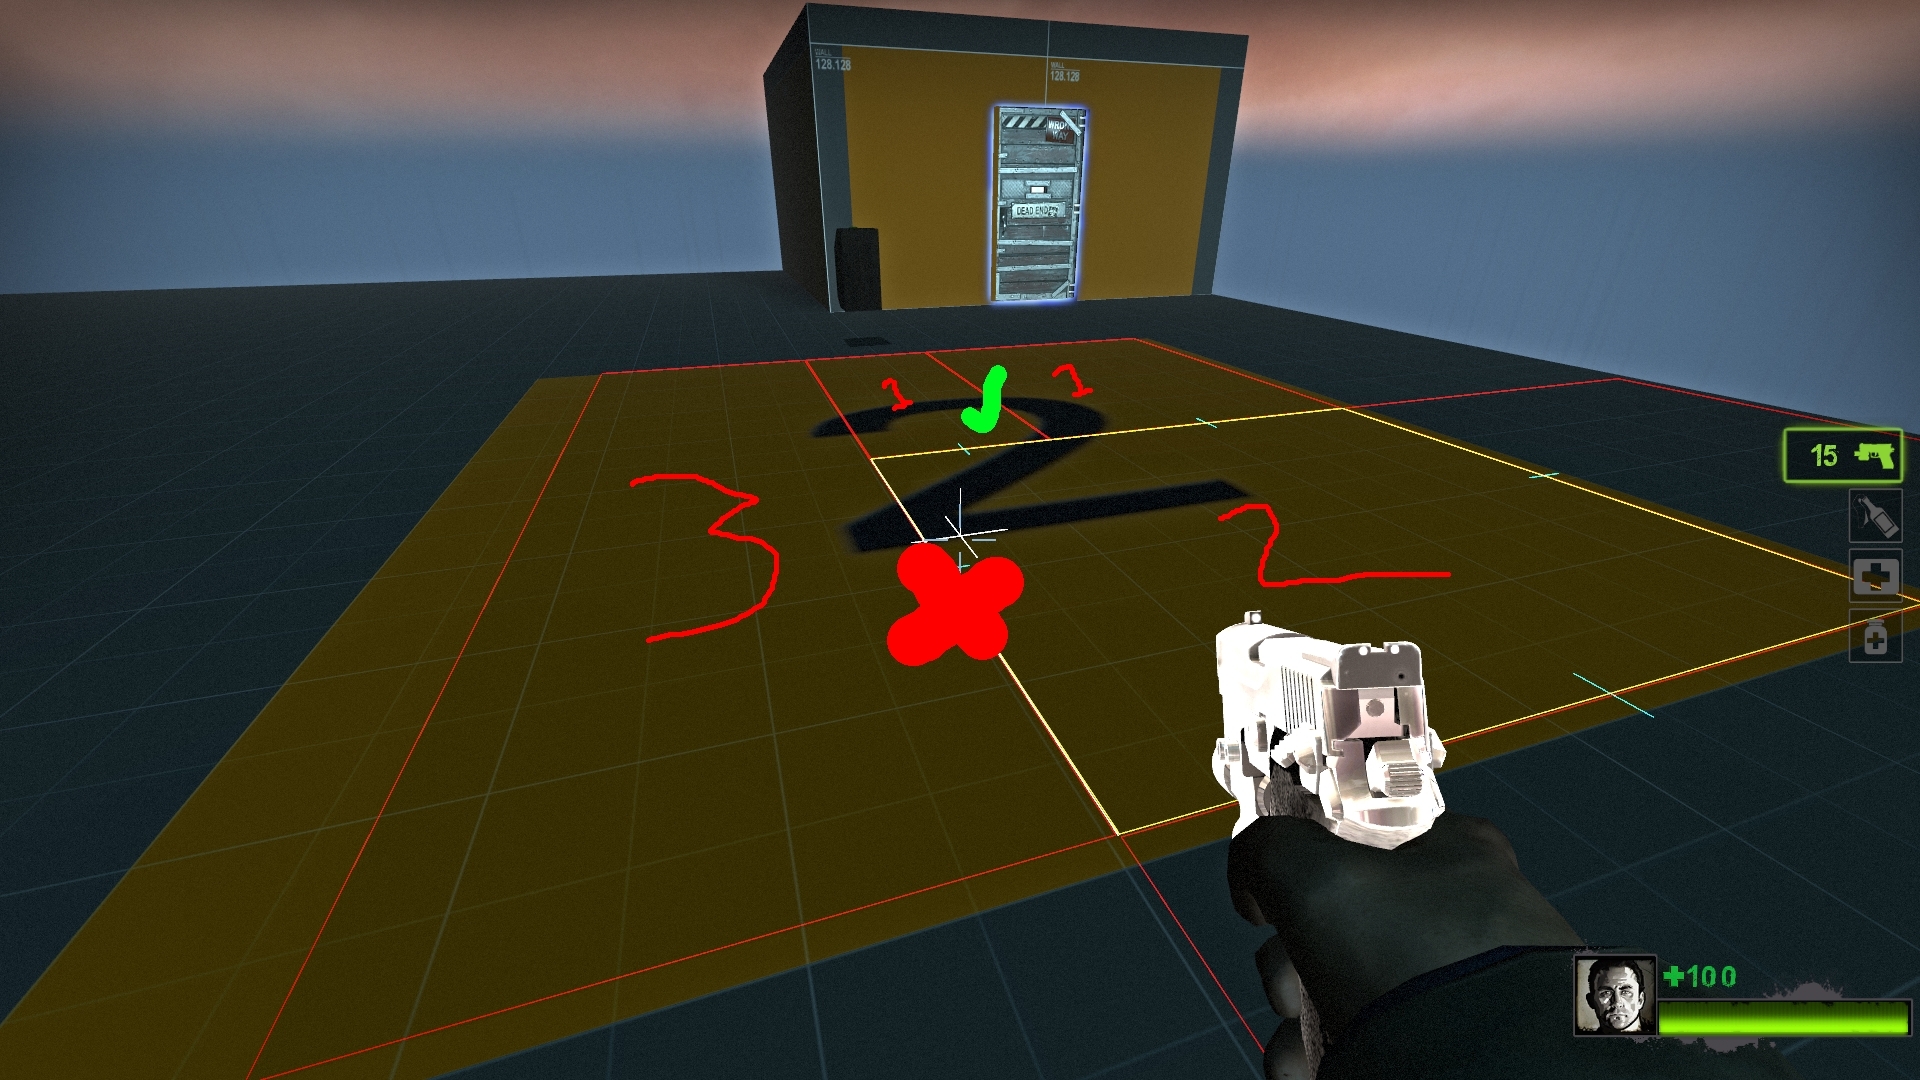
(due note source engine cannot have L shaped navigation areas so you have to find two similar shaped areas like shown below which CAN be merged, and then you can merge the area you couldnt before!)
 .
.
As you can see from above screenshot, i cannot merge 3 and 2 together because the sides do not connect to eachother fully as 1 is blocking the way.
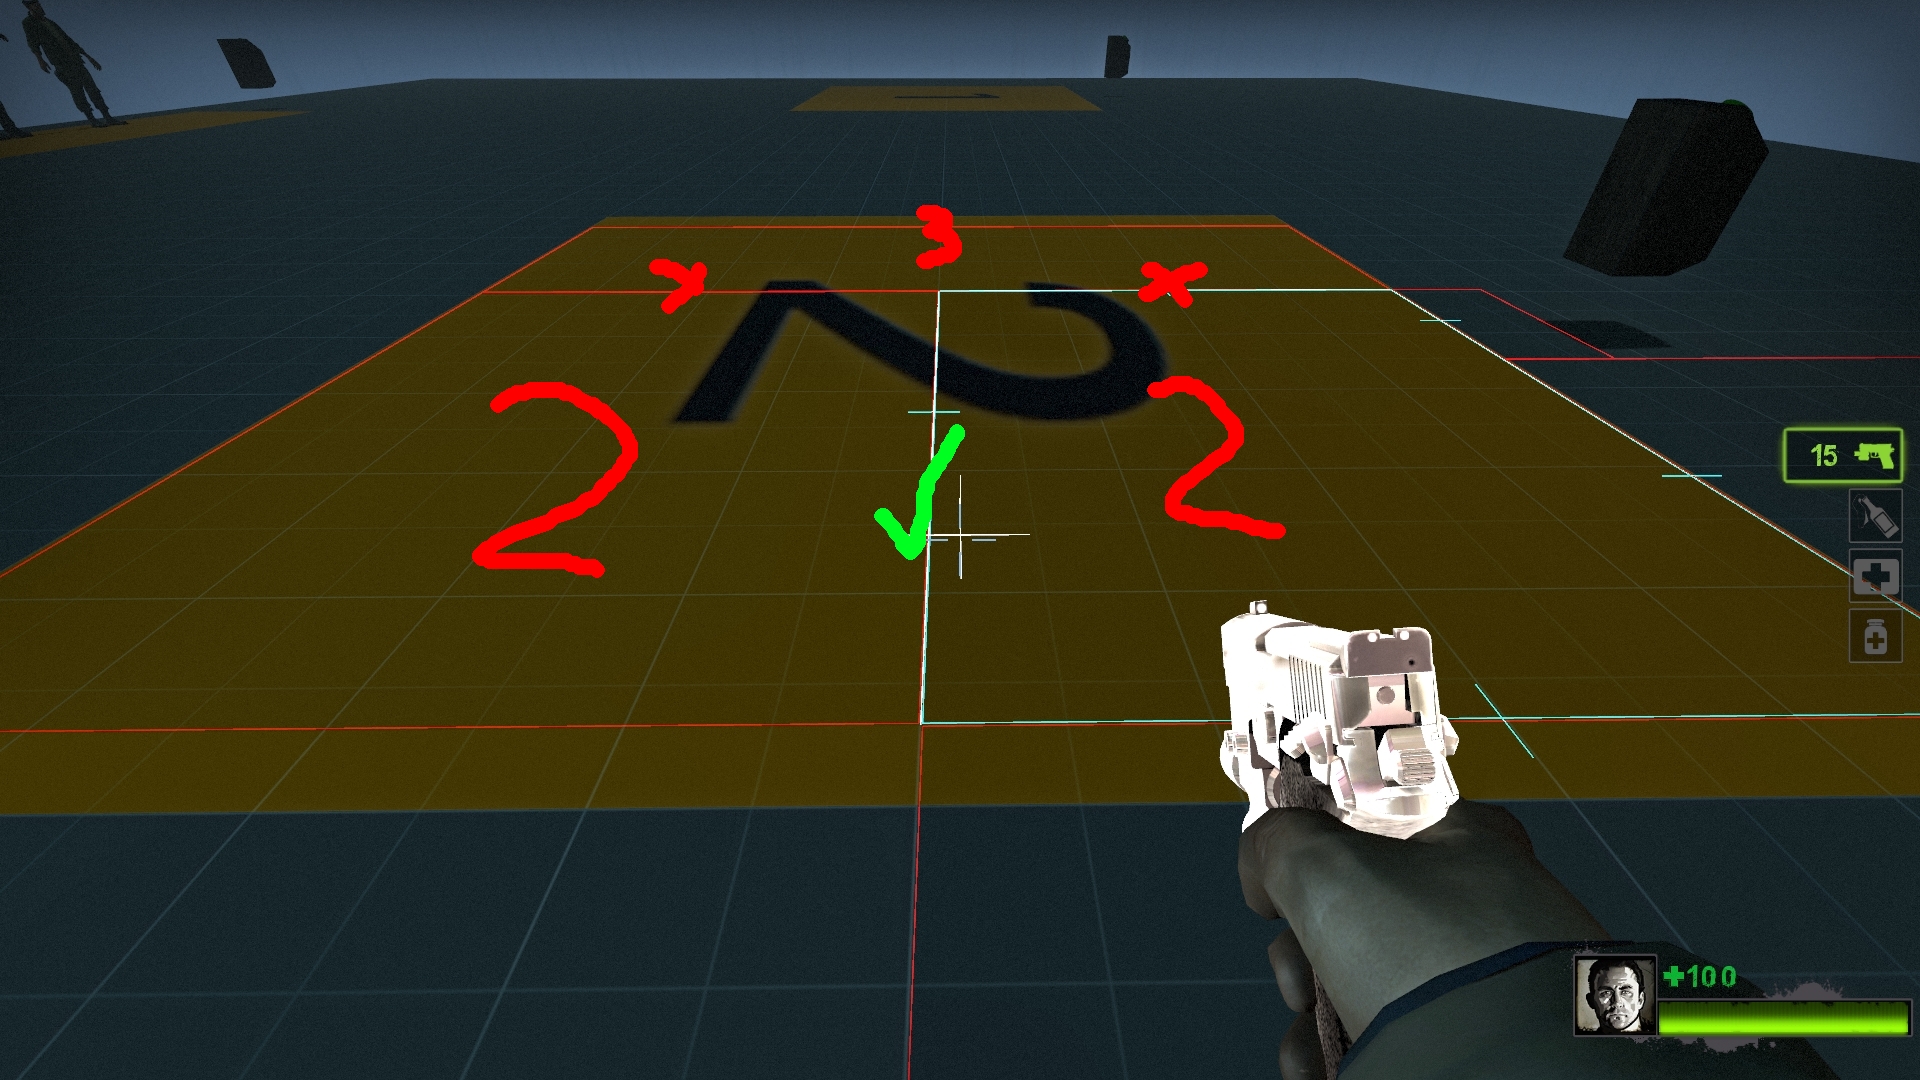
HOWEVER i can sort this out by merging both 1 which will make 2, then merge both 2s and then merge both 3s to get what I want!
 .
.
As seen above, both 1s have been merged and now they can merge into the area on the left which is 2.
 .
.
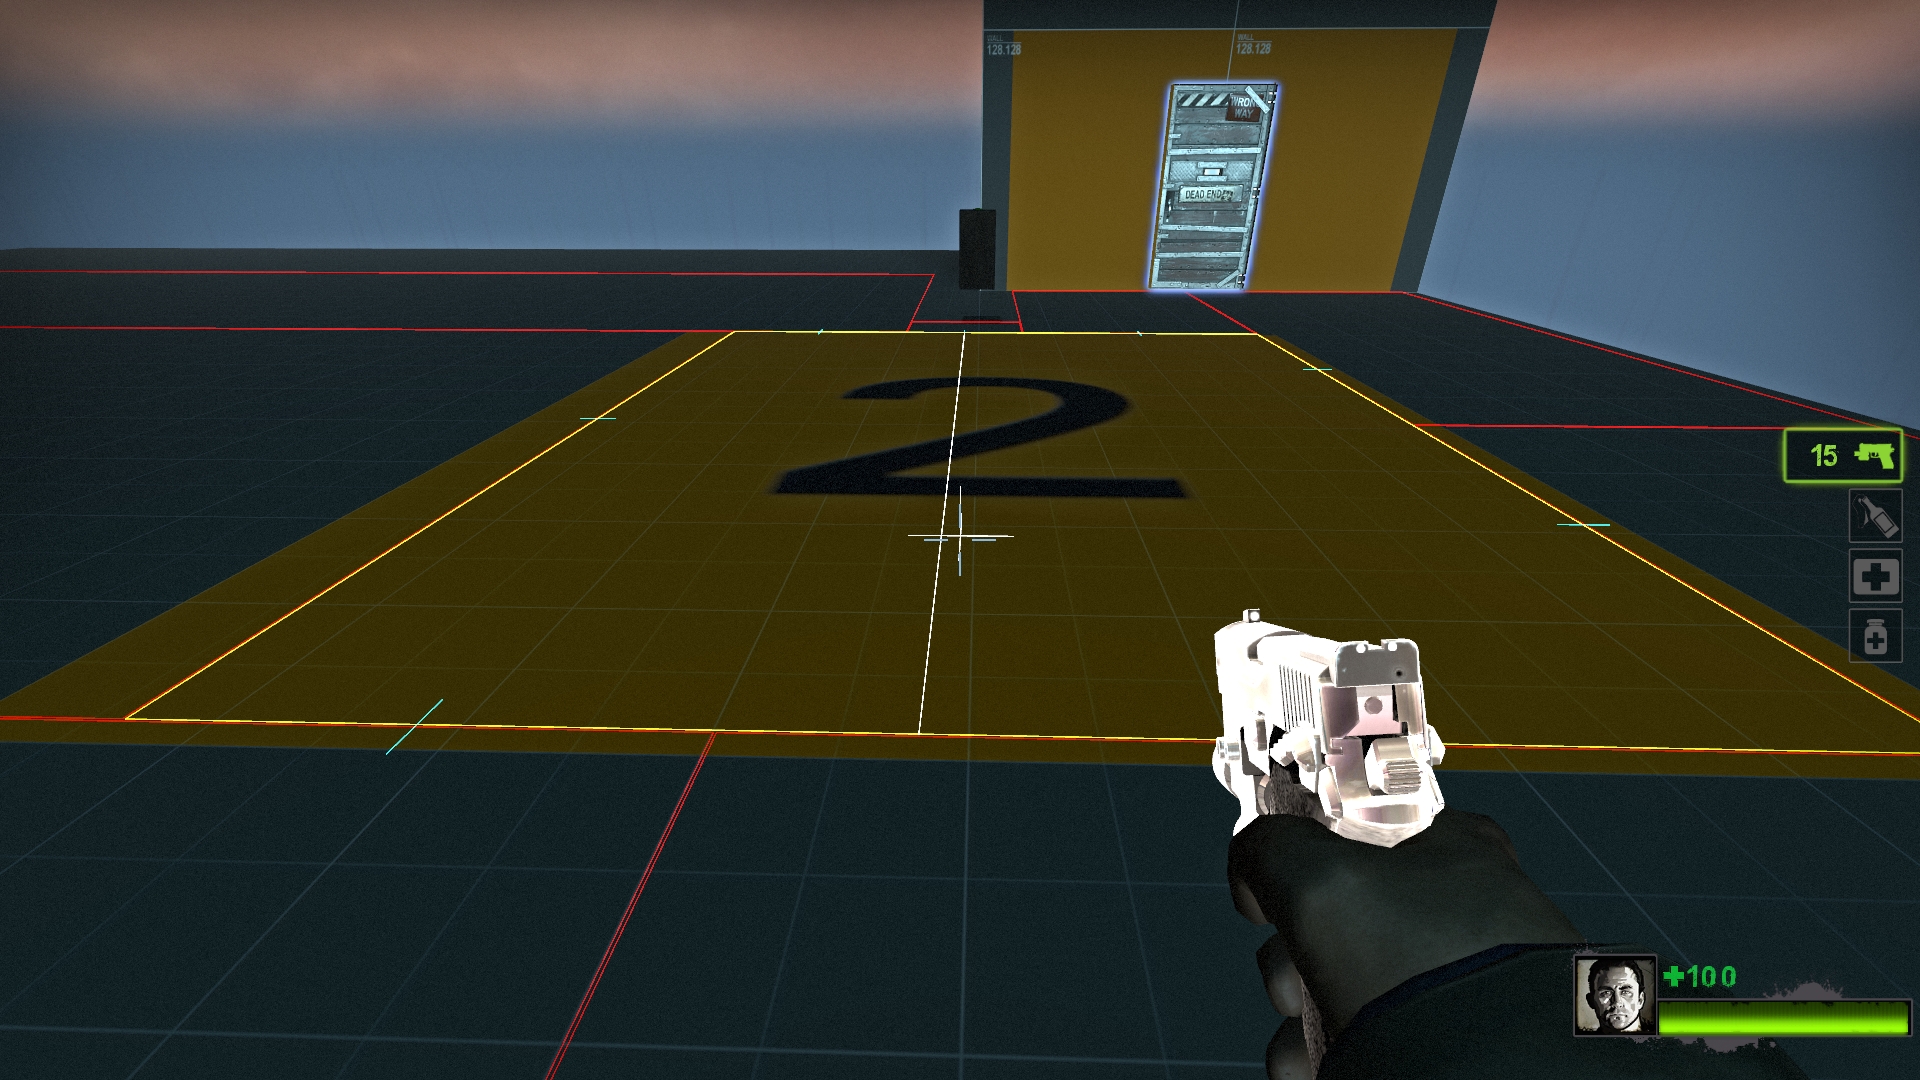
Finally, you may or may not believe this but now we can merge the 3 to create what we finally wanted at the start!
 .
.
It is now finally a square navigation area, just like you wanted thanks to merging.
DONT FORGET TO nav_save TO SAVE ANY CHANGES TO THE NAVIGATION AREAS SO IT WILL WORK ONCE THE MAP COMPILES AGAIN WITH ATTRIBUTES
With this part finally done you now know how that navigation areas are important for the L4D passing bots and have sliced or merged navigation area(s) you will want to mark as spot(s) to make the L4D passing bots to go to.
Passing Bot Navigation [PART 1: Moving the L4D Passing bots to one Spot]
Passing bots are different then normal L4D2 survivor bots as they do not follow the player(s) but instead follow a certain navigation attribute called “Battlestation” where depending on the size they will only move around in that navigation but will favour to stand near the edges of battlestation attributed navigation areas.
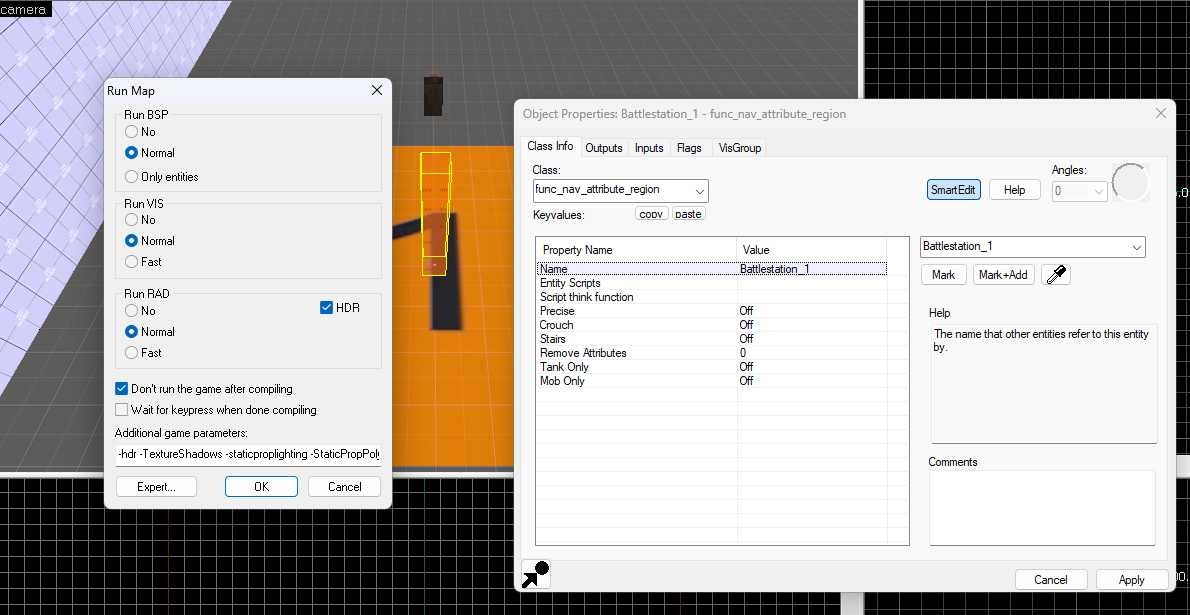
First, create a brush and make it a trigger texture and then CTRL + T and make it a ” func_nav_attribute_region “. On the flags section of the “func_nav_attribute_region” tick “BATTLESTATION” only for this to work.
 .
.
Now, if you have sorted the navigation right like what was shown on part 0, compile the map and the L4D Passing bots once spawned they will head straight for the battlestation navigation area that the battlestation trigger has marked as “Battlestation”.
Passing Bot Navigation [PART 2: Moving from Battlestation 1 to Battlestation 2]
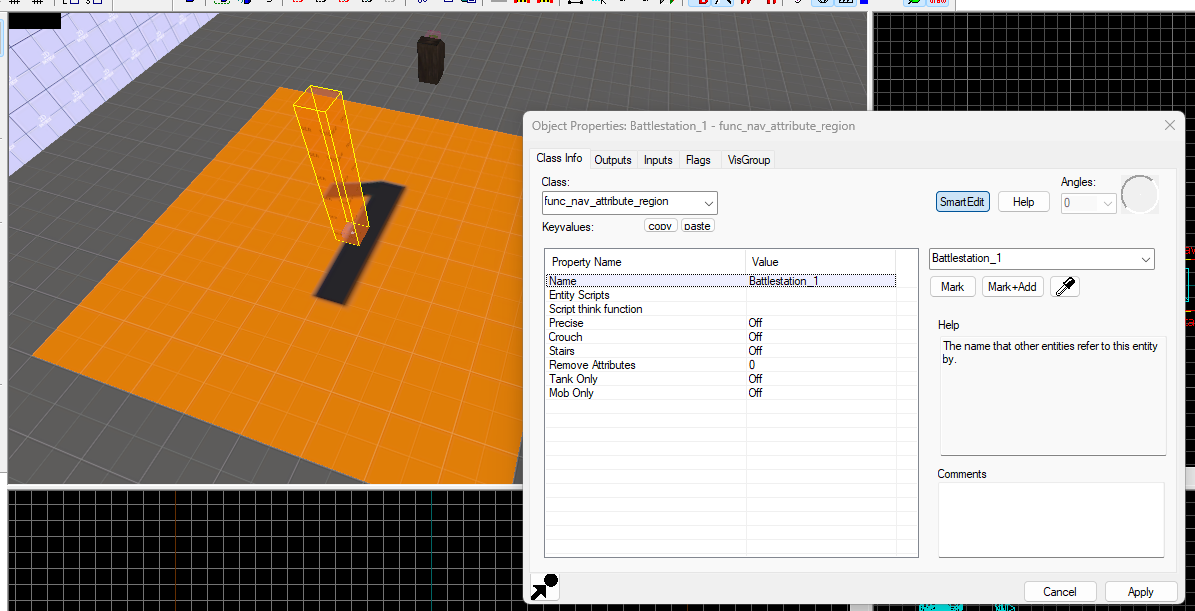
As you may have noticed from the screenshots, i have named the “func_nav_attribute_region” as “Battlestation_1”
 .
.
Yes, that’s right. With some templates and nav deleters you can make the L4D bots go from one battlestation to another. For this tutorial I will make them buttons that will change the bots to go to spot 1 to spot 2, etc. You will likely have this via trigger_once or a relay to make it look like the L4D passing bots are moving forward to another defence position.
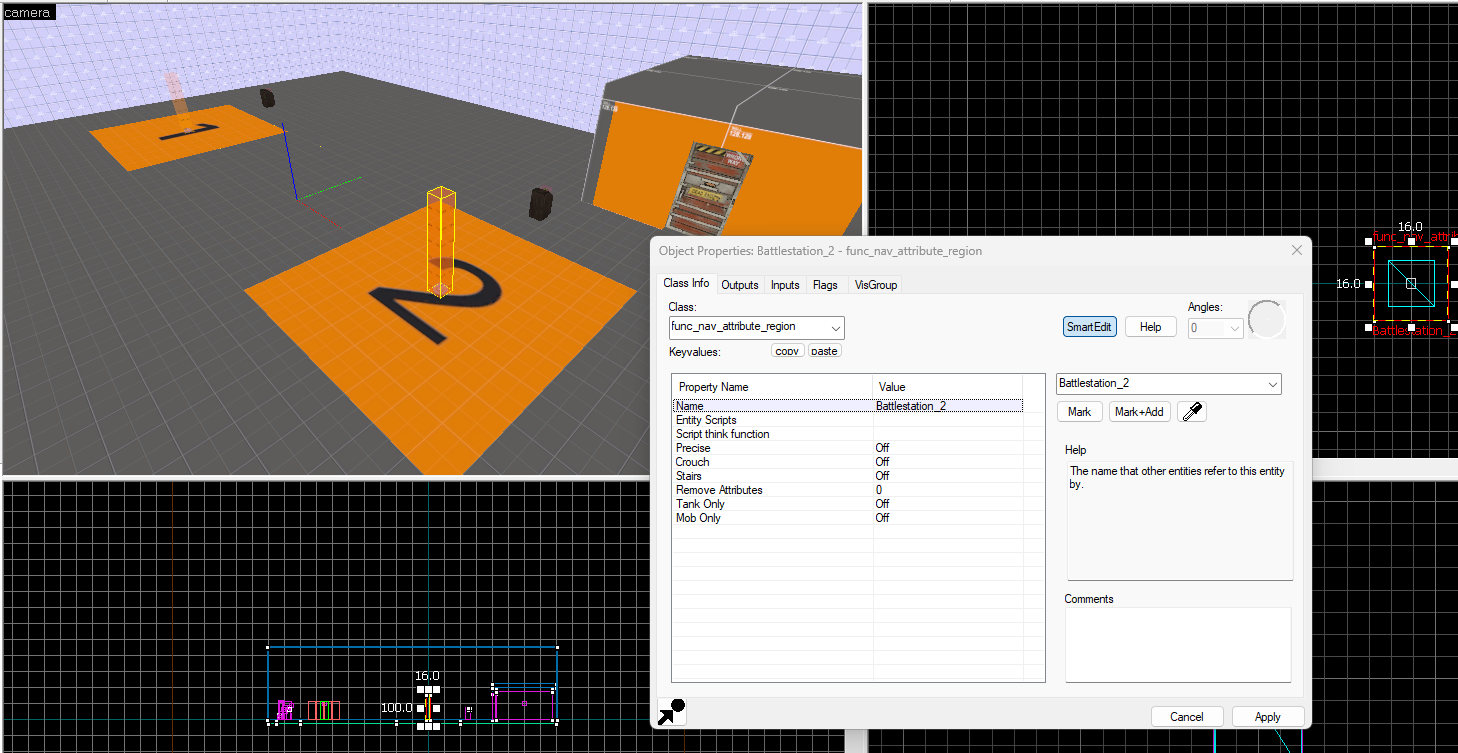
Let us create another func_nav_attribute_region as Battlestation_2. You can just copy and paste the first one and rename it. Make sure to have the battlestation flag checked!!!
 .
.
Now, there is a problem. The bots will only go for the first battlestation attribute and ignore the second we just made. How do we fix this problem and be able to change what spot the bots go to willy nilly?
 .
.
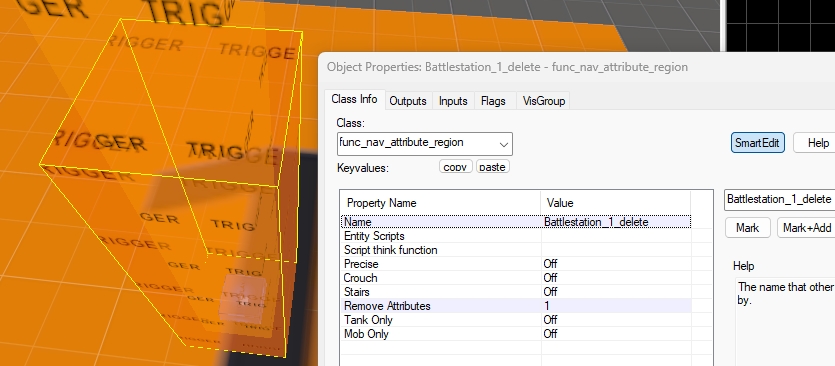
This is where I introduce the attribute destroyer. How do you make this? Simple, just copy and paste the first Battlestation and change a simple value called “Remove Attributes” from 0 to 1. Now this will delete the attribute when spawned. Rename it to include _delete so you know what it does.
Make sure to have the Battlestation flag checked for the deleter so it knows what attribute to delete!!!
Dont forget to the same with the second battlestation!!!
Now you have done that but wait a moment… Since both exist at the same, it just gives the battlestation attribute and then removes it!?!?!
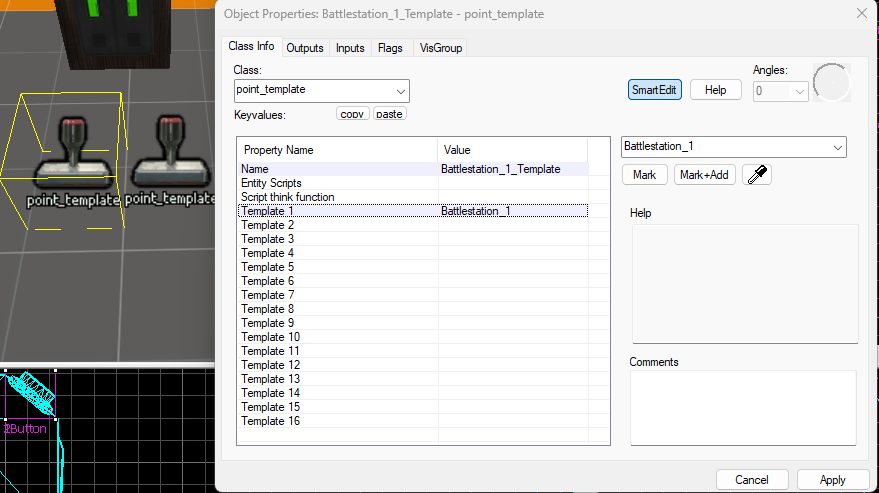
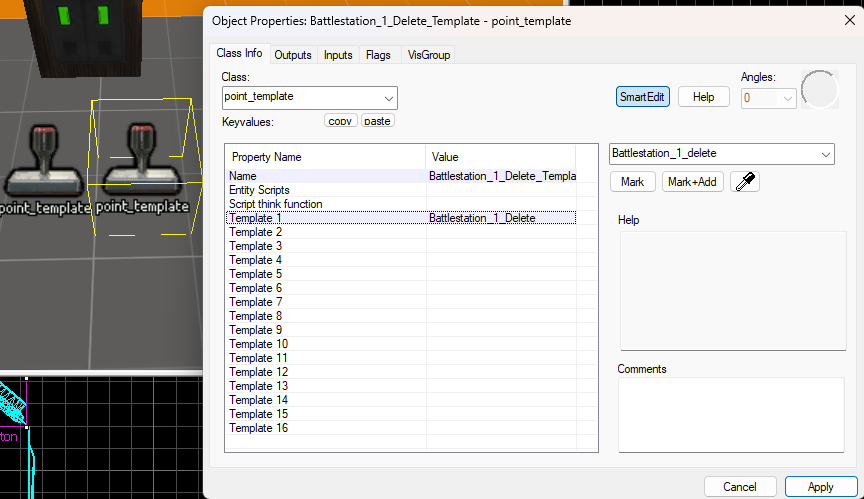
THIS is where we introduce the entity called “template”. For brainlets, templates allows you to spawn more of a object. Very handy for making spawning items pressing a button and such!
Make two template for battlestation and battlestation delete like seen below!
 .
.
Make sure to make the same templates for your second battlestation!!!
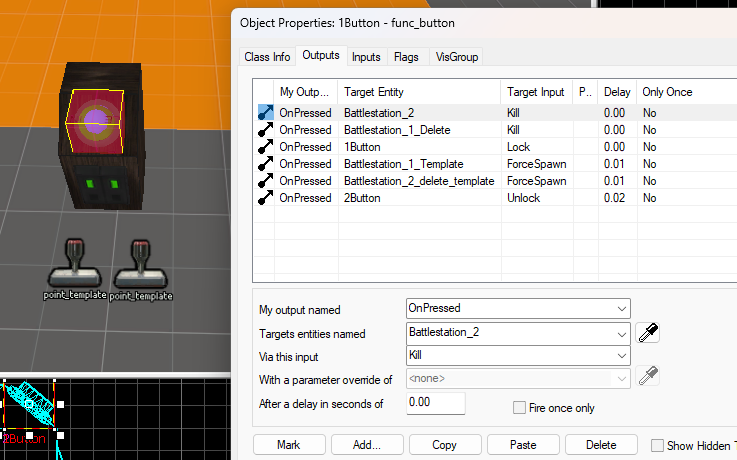
Now since you have both templates ready, we will for this tutorial use buttons to summon battlestation and delete the other battlestation’s attribute.
 .
.
This is how you swap from one spot to another. For buttons make sure to lock them to prevent any bugs when pressed and unlock the other.
Make sure to do the same with the second button, trigger, relay or whatever. But make sure it first kills Battlestation 1 and Battlestation 2 Deleter and 1 nano second later force spawns Battlestation 2 and Battlestation 1 Deleter.
proof it works below
—————————————————————————————
NO BUTTONS PRESSED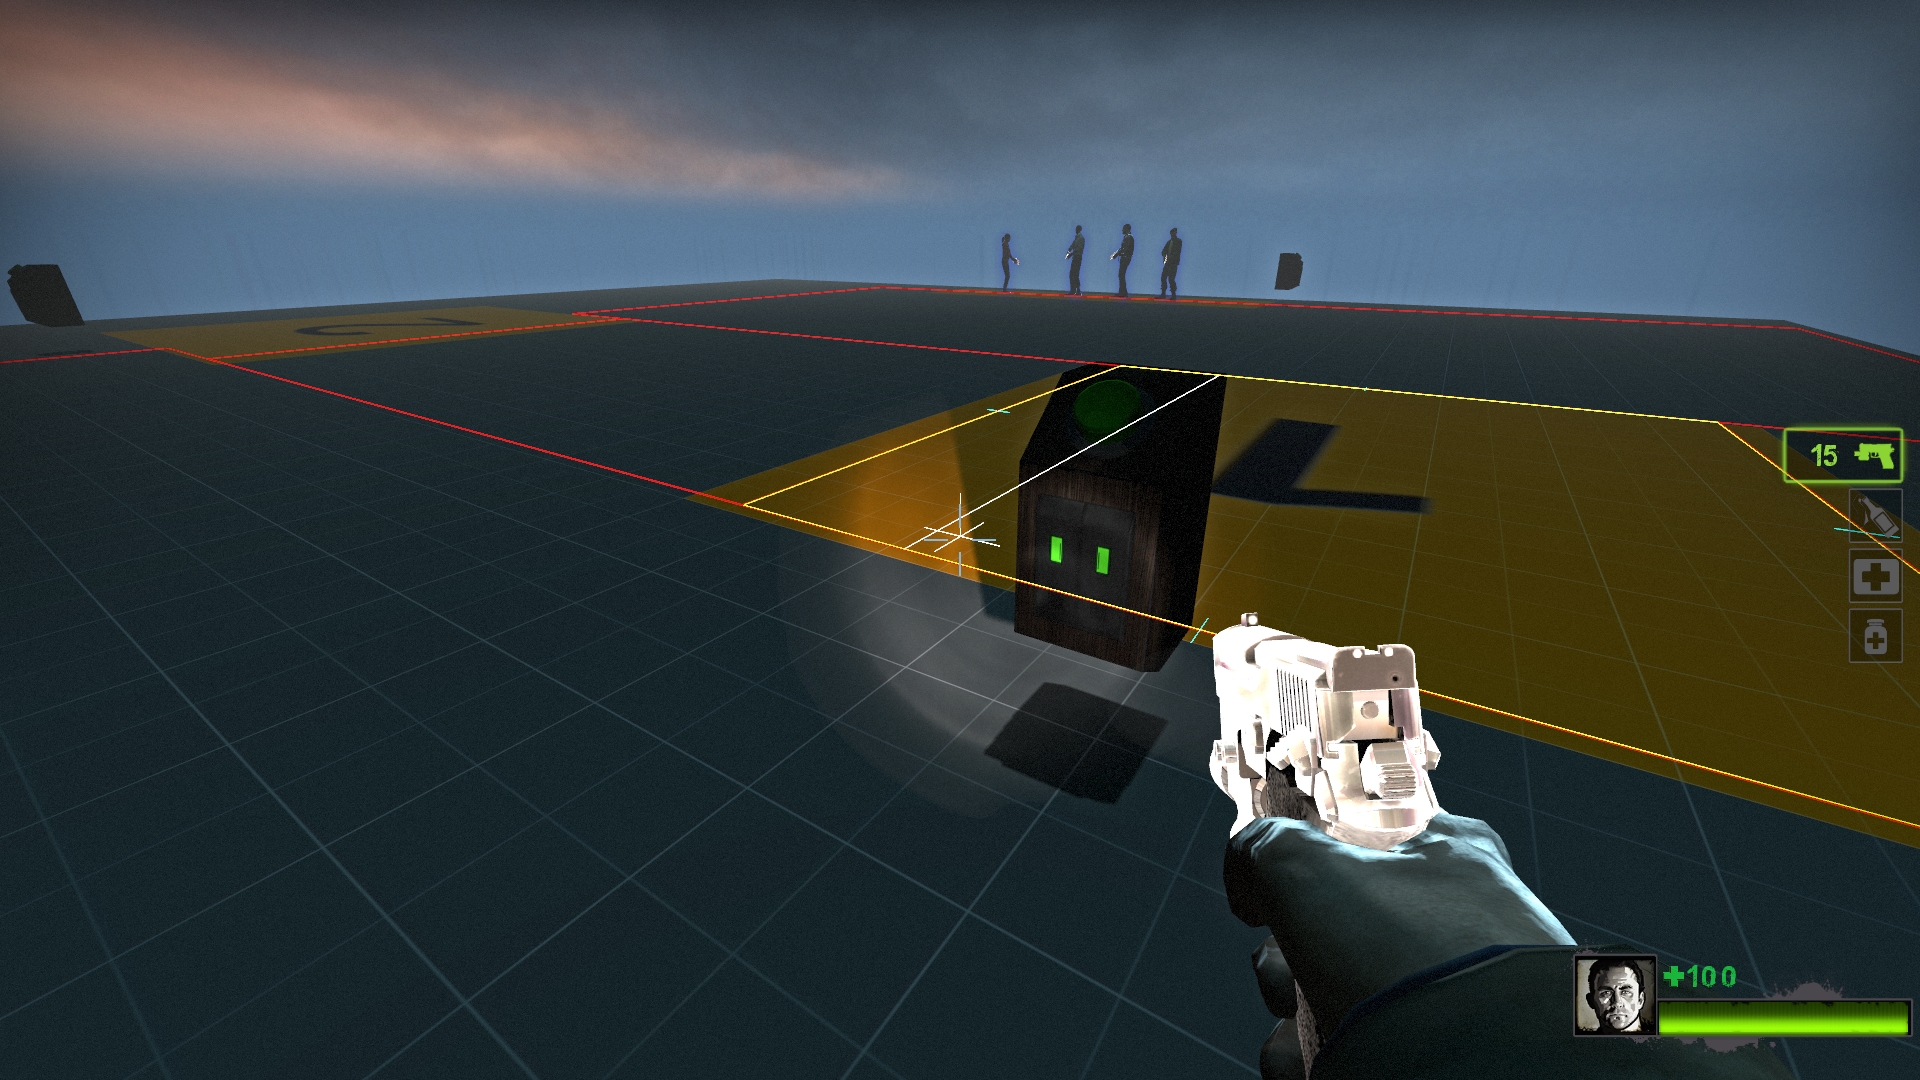 .
.
.
.
Button 1 Pressed (Spawns Battlestation 1 and destroys Battlestation 2)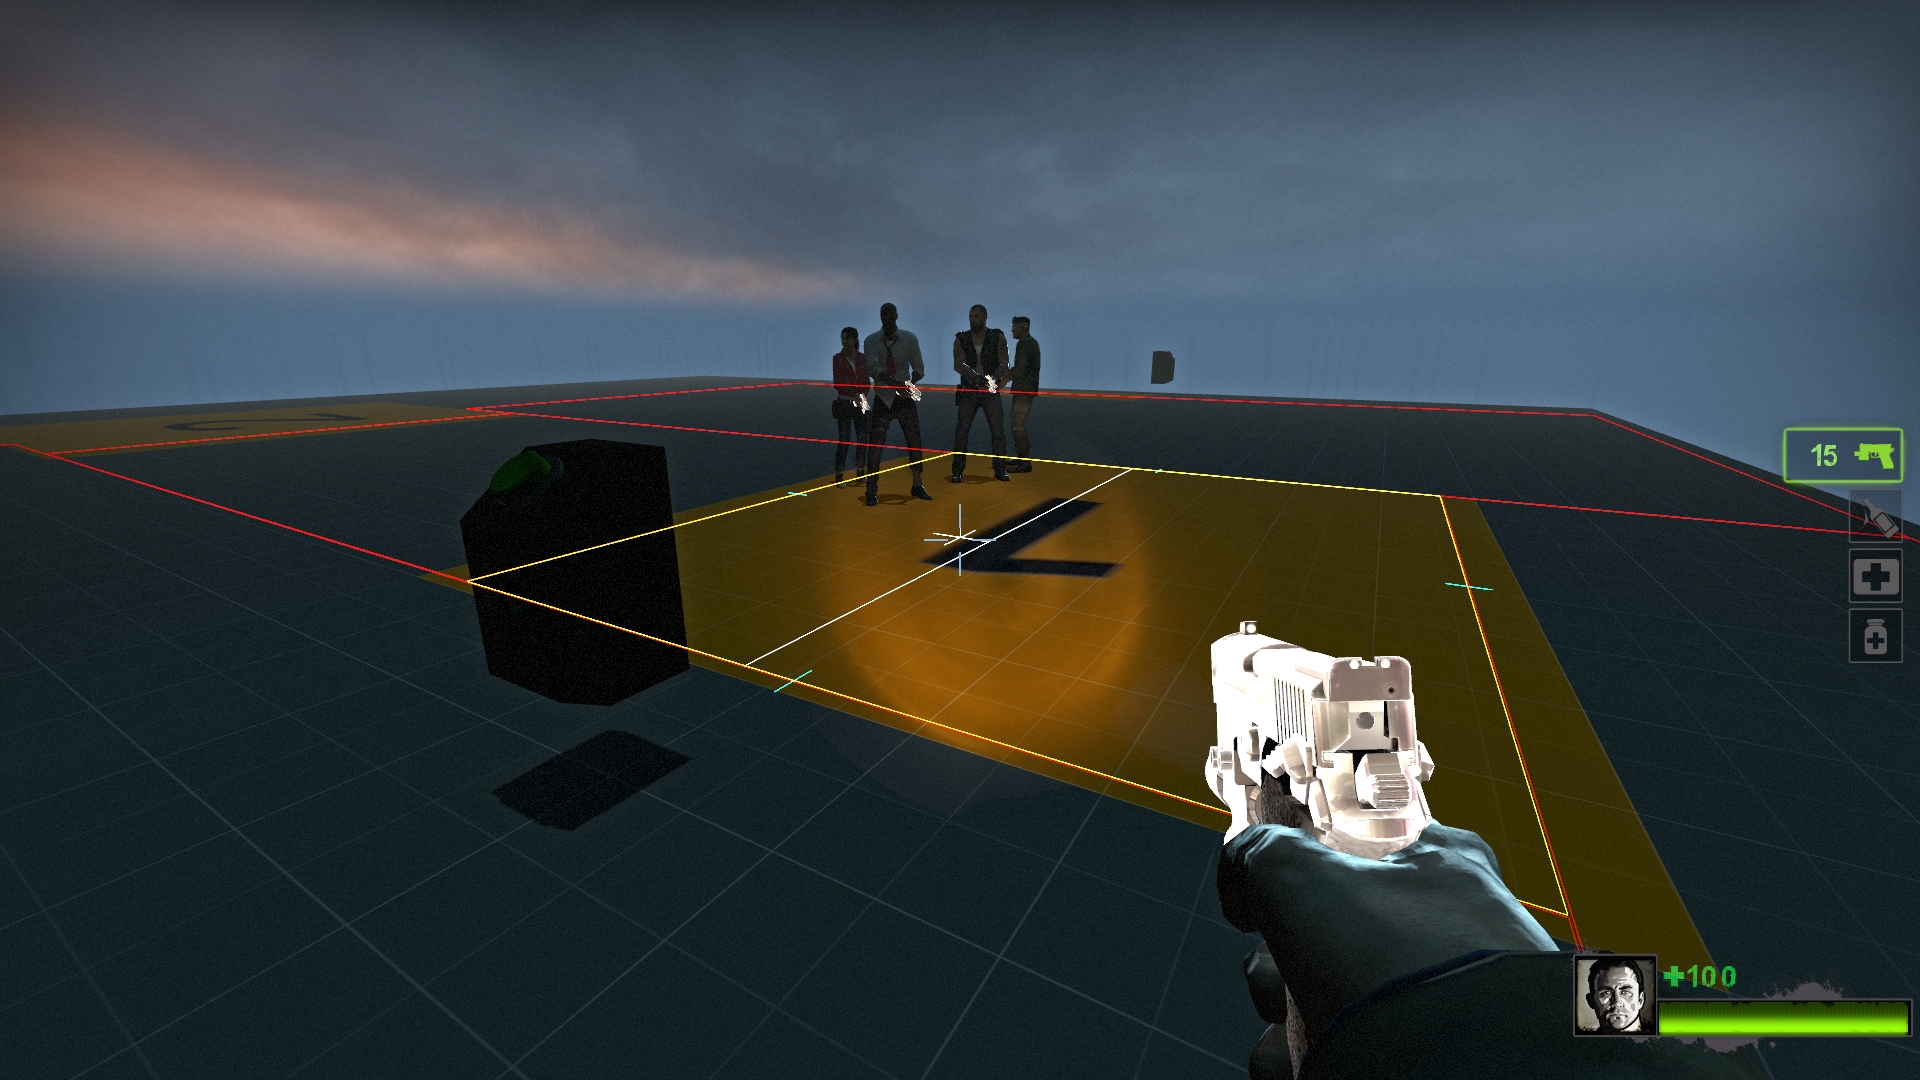 .
.
.
.
Button 2 Pressed (Spawns Battlestation 2 and destroys Battlestation 1)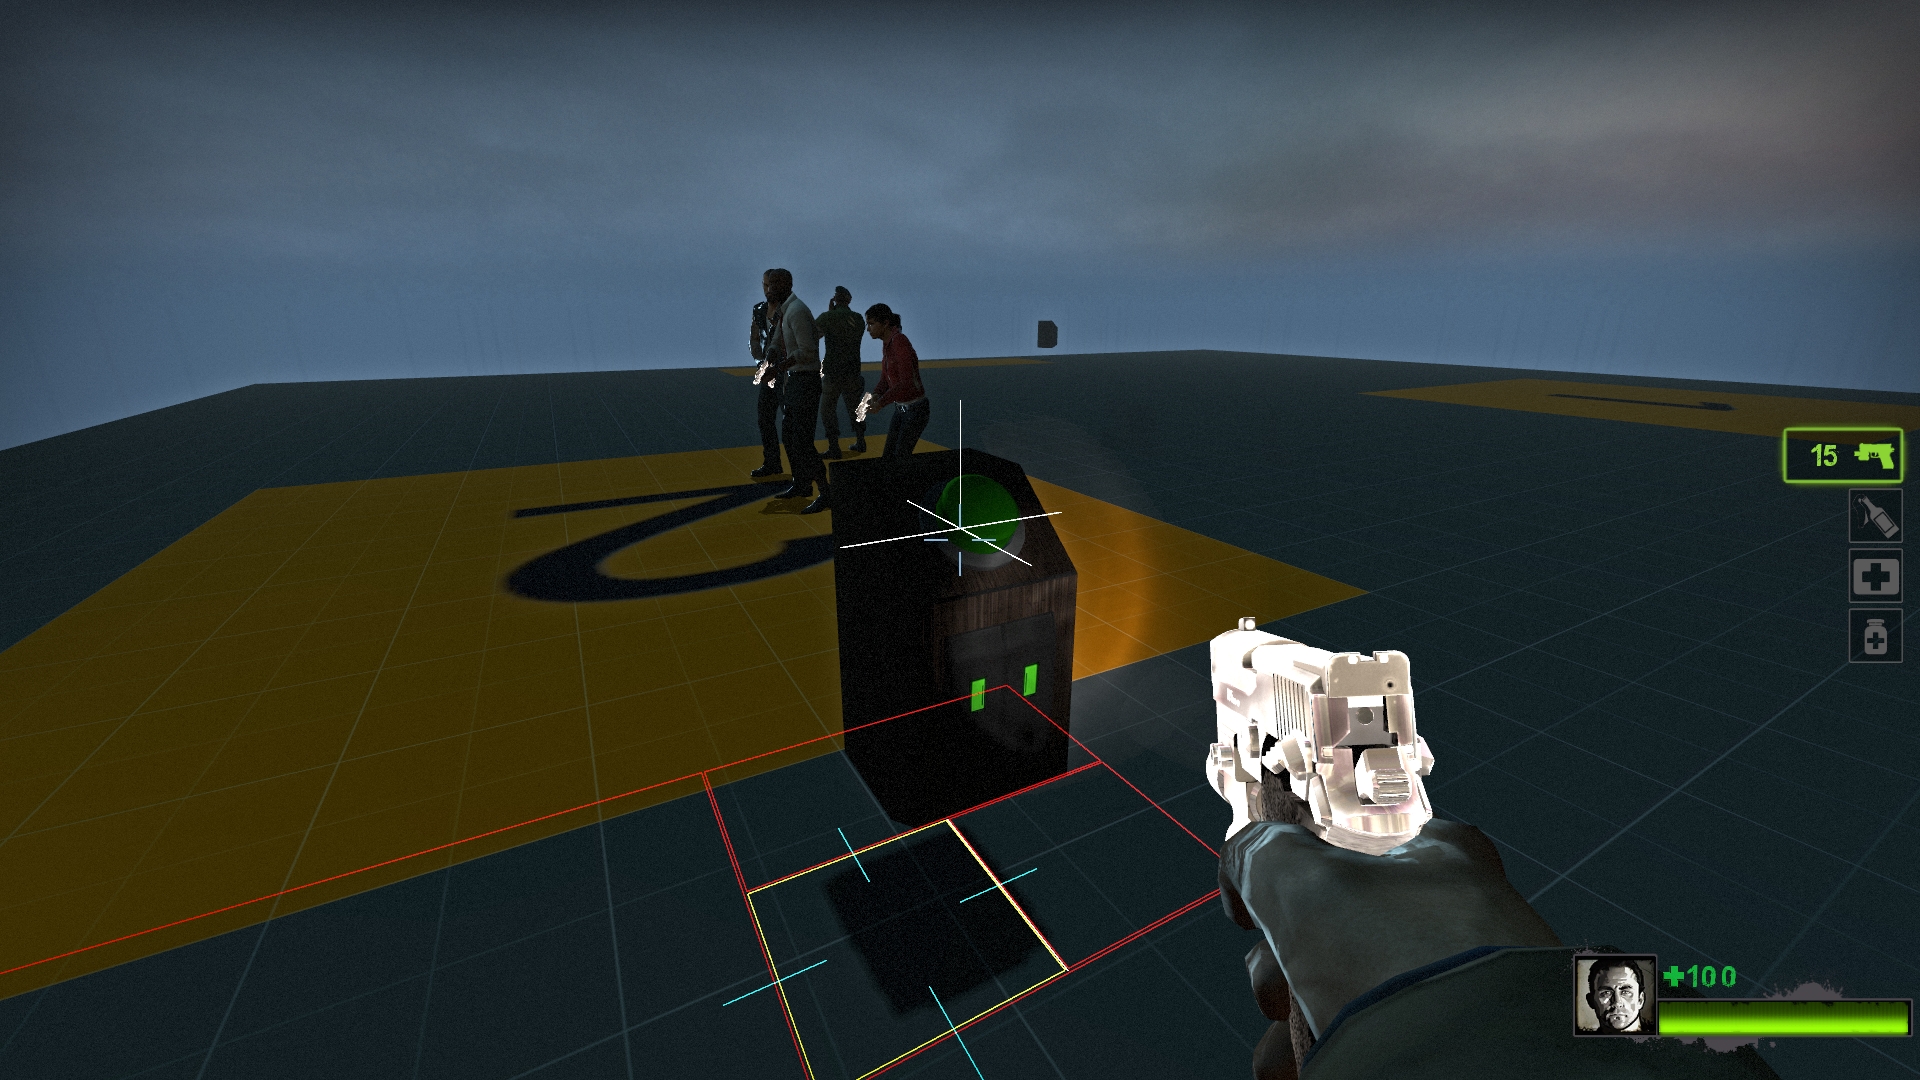 .
.
.
.
As you can see you can redirect the L4D bots to different battlestations, great for maps with defence where players can move them from one spot to another.
Passing Bot Navigation [PART 3: Make them Open Doors and Activate triggers only for L4D Passing Bot]
I dont remember exactly but i’m certain The Passing bots are not able to open doors without help.
How do we fix this?
Simple!
First, make a filter for each L4D bot. Use Filter_Activator_Model and select their survivor models as the check. Example shown below.


 .
.
Now make a filter_multi and select all L4D bot filter and group them as “Filter_L4DPassingBots” like seen below.
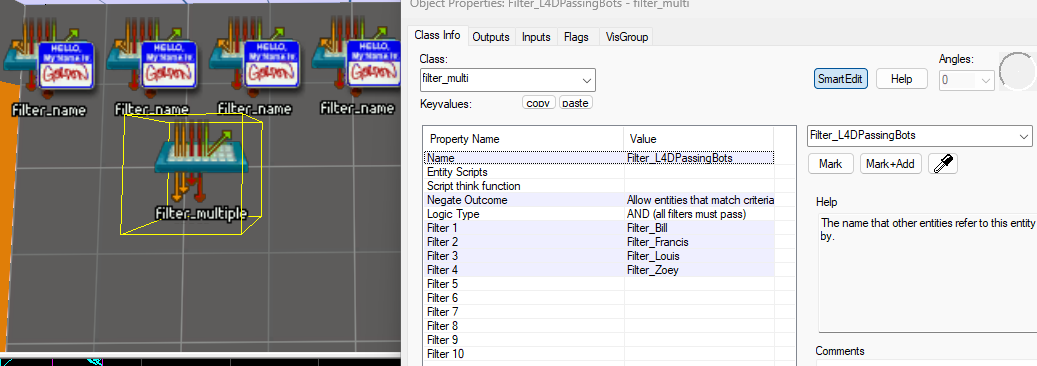 .
.
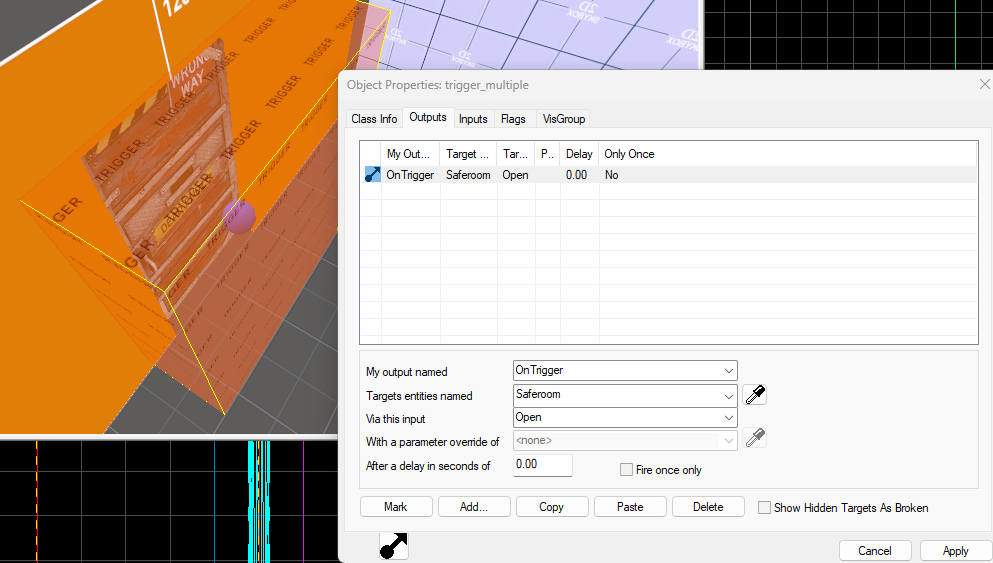
Create a trigger_multiple and filter it with L4DPassingBots only so L4D2 characters or infected cannot enable this trigger.
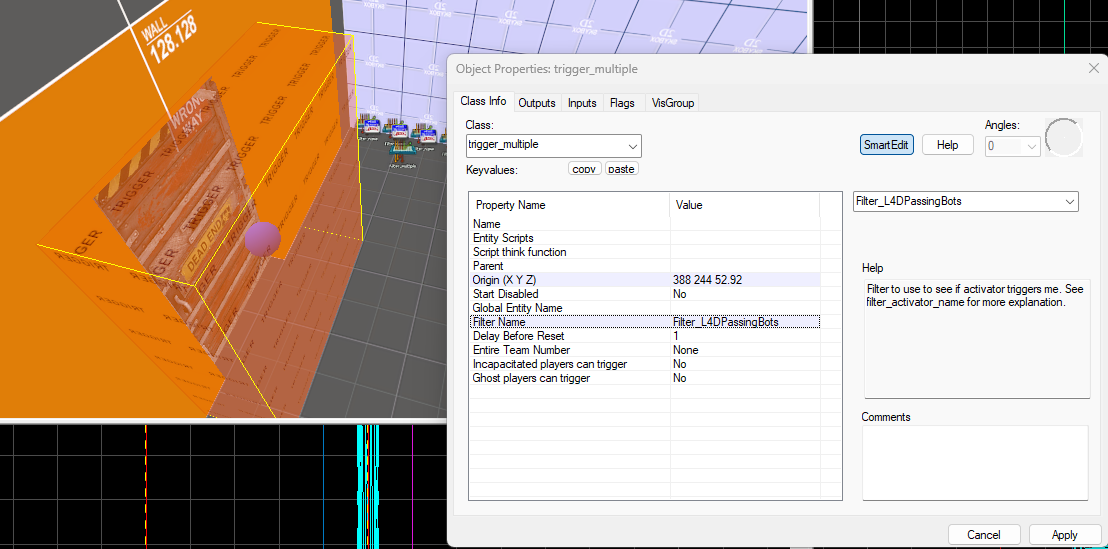 .
.
Now set your output of the trigger to force open the saferoom door as you have named it.
 .
.
Now you know how to filter, you can set it to anything else to activate triggers when the L4D passing bots touch the trigger. Very useful information!
End of Tutorial
BTW before you ask, Passing bots will pick up Guns if they walk by one or one is nearby, they can even delay going to the battlestation and quickly go off the path to pick up a weapon and go back to going to the battlestation.
Unfortunately the passing bots can pick up medkits, pills and adrenaline and not use them at all. I suggest giving them these next to the bots when they spawn so they can pick them up and not steal from players.
If you are lazy and want to download the map, here is the google drive of the VMT, BSP and NAV of the devtest_1 map i used in this tutorial.
Google Drive Link to Map Files including Compiled BSP + Nav Files[drive.google.com]
Make sure to put the compiled bsp and .nav files in the left 4 dead 2 map files or it wont register the navigation used in tutorial.
And that wraps up our share on Left 4 Dead 2: L4D2 Mapping Tutorial: L4D Passing Bots Guide. If you have any additional insights or tips to contribute, don’t hesitate to drop a comment below. For a more in-depth read, you can refer to the original article here by Entei, who deserves all the credit. Happy gaming!
