Welcome to “Maximizing TF2 Performance: The Ultimate Windows Settings Guide”! In this article, we will be discussing the steps outlined in the guide linked below. Assuming you have completed the steps mentioned, we will now move on to the next level of optimizing your Windows 10 or Windows 11 for better performance while playing Team Fortress 2. Let’s get started!
(Important) Create a Restore Point
Warning : Dont attempt to skip this step. i’m not responsible if theres any damage on your software because you are too dumb to skip this step.
Follow the steps listed below to create a system restore point :
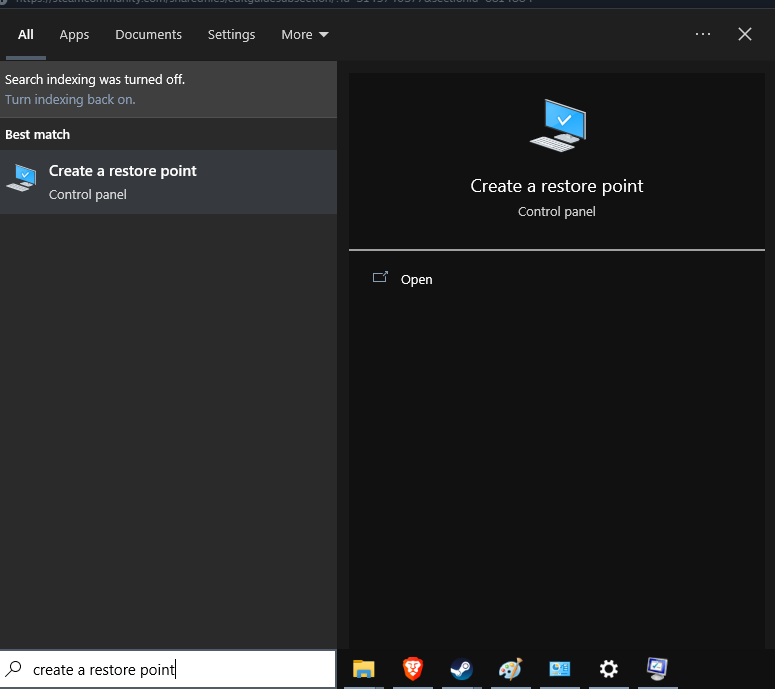
1. go to search bar and type “Create a restore point”
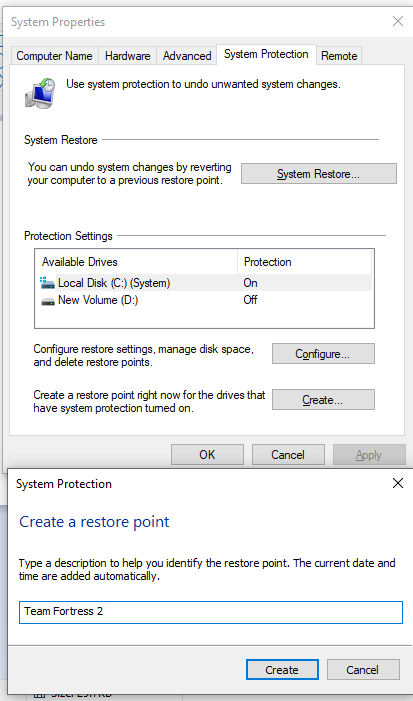
2. Click “Create Button” name it whatever you want then your system restore should be ready in case theres a setting that messed up your windows.
Disabling Windows Defender (Plus brief explanation why i hate Windows Defender)
I often hear the phrase and have used the phrase “Windows Defender is good enough”, but often get mistaken in to thinking Defender is a good Anti-Virus. For detection rates it is good, but for protection it is NOT! Why? Anyone with a little bit of knowledge knows how to disable it without the user even knowing it. The services, registry entries, and built-in windows policies are designed to make it easy for an administrator to disable it. Why does Microsoft make it so easy to disable it? Simple, Windows in business environments never use Defender and administrators need to disable it.
Windows Defender is often seen as a good antivirus, but I want to inform you of a cost noone sees but developers because of Defender.
Yes. It does detect a ton of viruses and have good detection rates as long as you are online, since it relies heavily on its online connection. However, there is a dark side to having Microsoft control this entire part of your PC that we need to go over. The false positives are excessive and I believe it is by design.
Until then, follow the steps listed below to disable windows defender in Windows 10 :
#1) Before downloading, make sure your antivirus is turned off. Because anti-virus & other programs might flag this as malicious since it disables defender. but rest assured, its safe. this project is open-source and theres nothing to be worry about. follow these steps to disable defender before downloading this project :
-go to start menu and go to windows security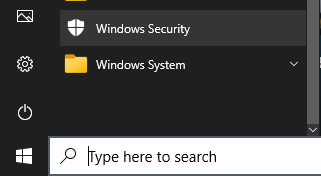
-A window of windows security will open, go to “Virus and Threat Protection” tab and go to “Virus and Threat Protection” settings and click “Manage Settings”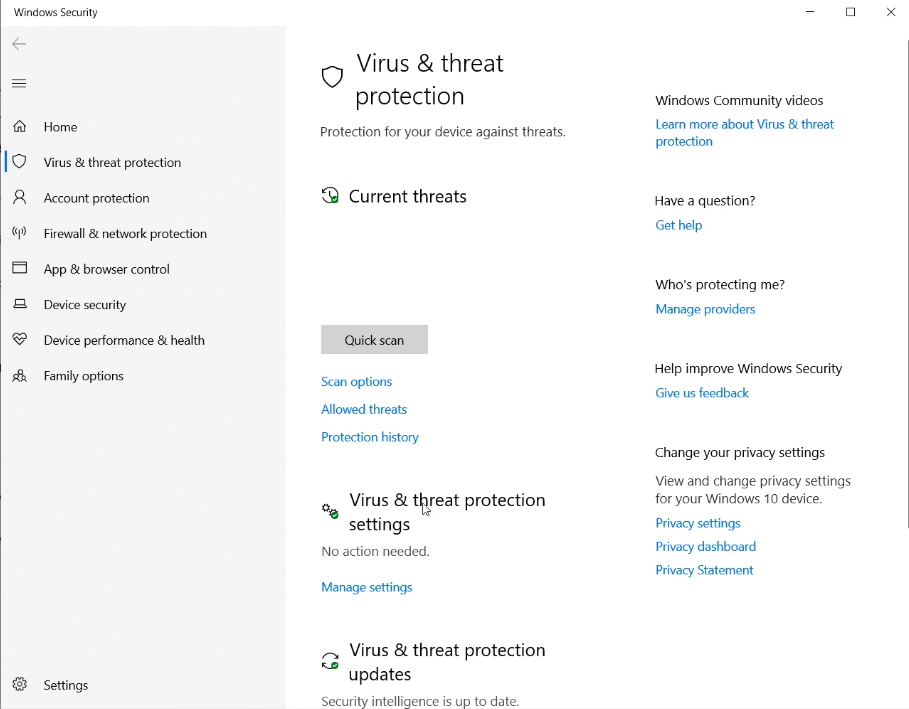
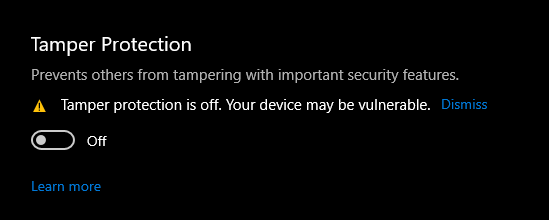
-turn everything off by sliding the button till it says “off” from “real time protection”, cloud delivered option”, “automatic sample submission”, and “tamper protection” 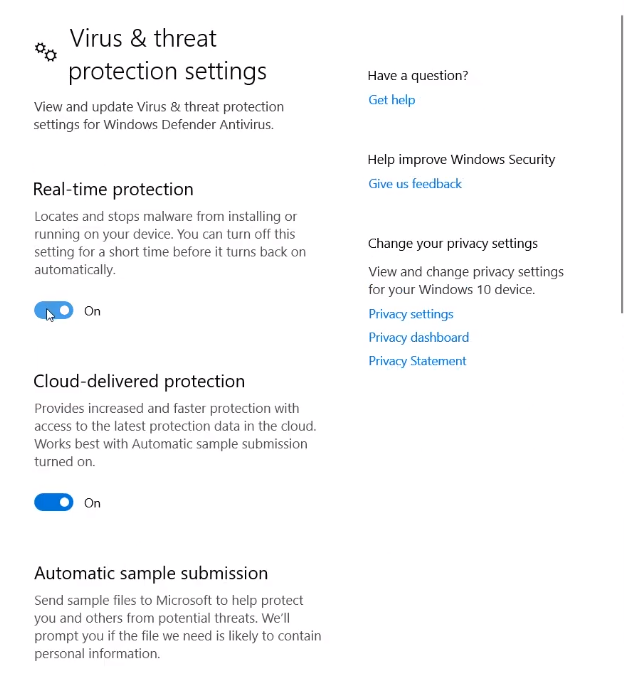
#2) once its done, open your browser and go to search bar and copy this link
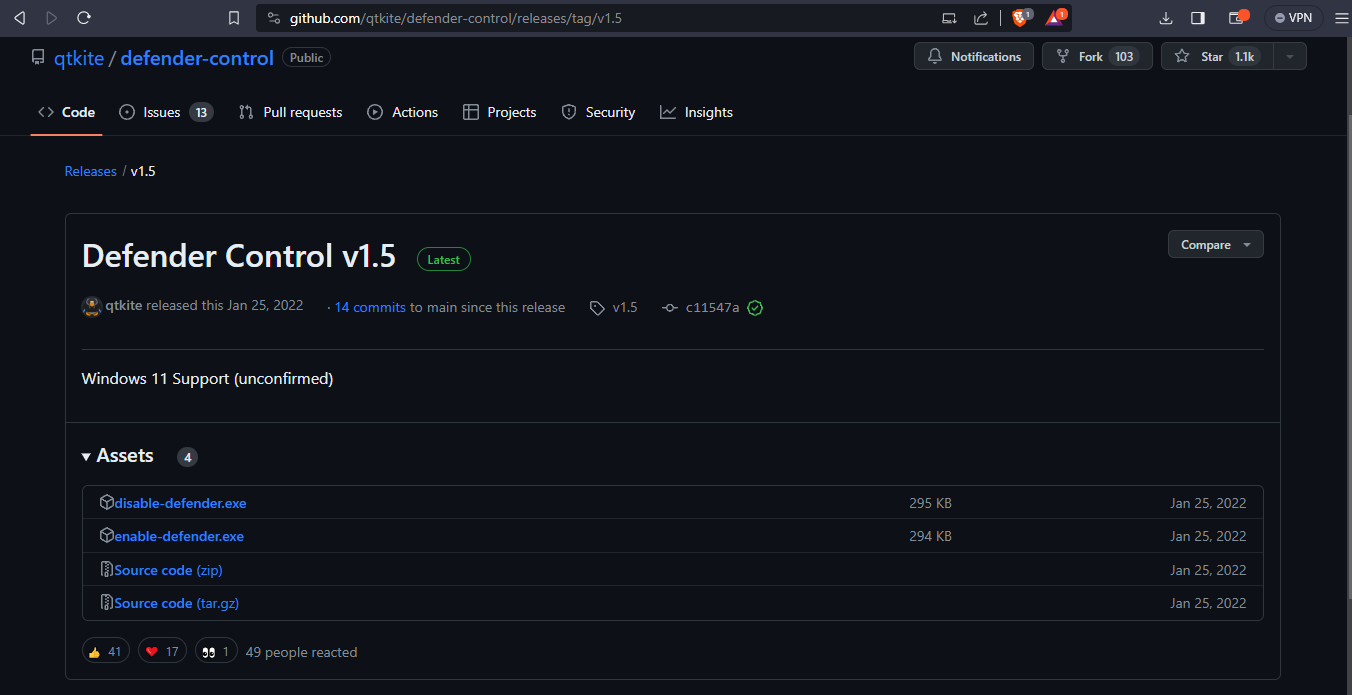
https://github.com/qtkite/defender-control/releases/tag/v1.5
#3) it will redirect you to this github project created by qtkite if you did it correctly, it should be appeared like this and download file patch of “disable defender”. you can also download “enable defender” in case you wanna revert this tweak
#4) once it downloaded, go to “This PC”, go to your download file, find the downloaded file, right click on the “disable defender” executable file and click/elevate run as administrator, click accept/ok if it prompted. a command prompt will open, wait until the process is done and dont click anything when it progress.

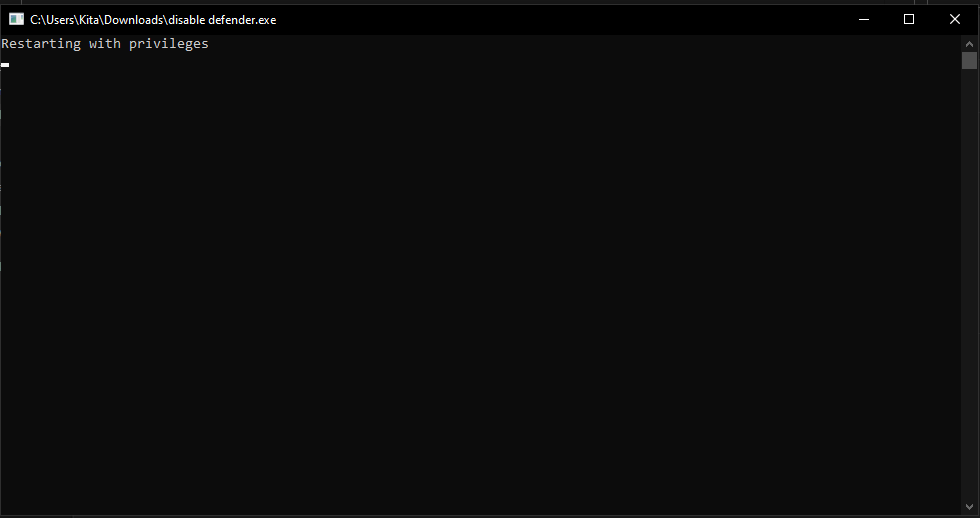
if you did it correctly, it should be like this in the end.
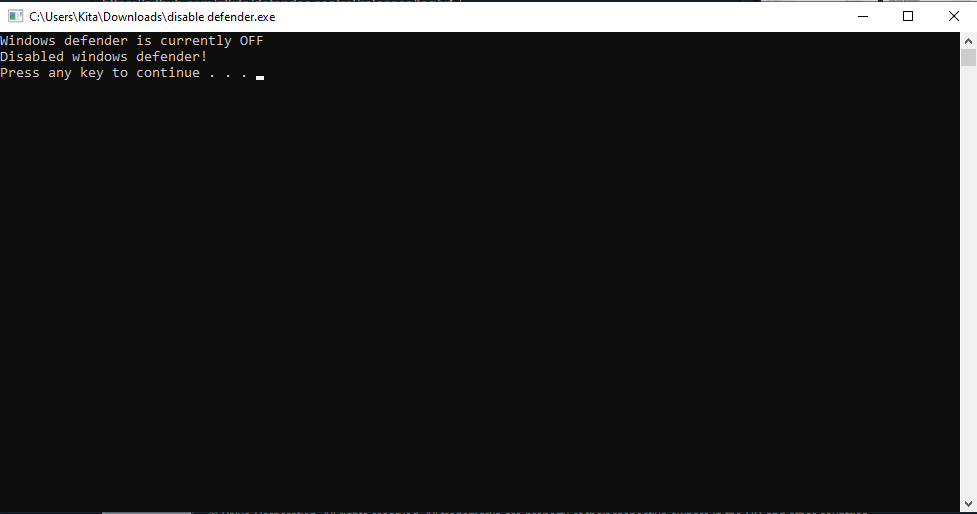
Once its done, reboot your system and we go to the next step.
(Cautious) Removing Microsoft Edge
My most-used websites are cached by Chrome anyway and using Edge shaves milliseconds off that loading time. Some websites, heavily dependent on graphics, load faster in Edge. But I still use Chrome. Why? Well, Gmail in Chrome simply crashes the page and I have to close the tab and reload it. If I open Gmail in Edge, my entire PC bluescreens. (True of past experience.)
My guess from this is that Edge handles graphics differently to other browsers, and so loads graphically-intense websites quicker, sacrificing the loading speed of more traditionally rendered websites. Not a stupid move, considering how popular such graphically intense websites are becoming.
Microsoft Edge showed significant performance gains over Google Chrome, but what’s most impressive is that Microsoft used benchmarks created by Apple and Google: Edge was tested using Google Octane, Apple JetStream, and WebKit Sunspider. That last one is actually a benchmark created by Apple’s WebKit development team
(http://appleinsider.com/articles/13/05/02/webkit-releases-new-sunspider-10-benchmark-to-chart-the-future-of-javascript-performance)
that’s intended for the iOS, Mac, and Windows versions of Safari, Apple’s web browser.
According to the benchmark results, Microsoft Edge was 112% faster than Google Chrome on WebKit Sunspider, 11% faster on Google Octane, and 37% faster on Apple JetStream.
Microsoft’s new web browser is up to 112% faster than Google Chrome
Again, this may be based on totally graphically-demanding websites that use lots of applets. If more ‘processing power’ has been put into loading graphics, that means sacrifices were made with traditional rendering.
Of course, there may be the factor of a person’s own hardware. Microsoft Edge may perform worse on lower-grade CPUs or CPUs with less (or more?) cores because of not utilising hyperthreading or multicore rendering.
those are my brief explanation and thought about Microsoft Edge so far. and here are the steps of how to remove Microsoft Edge completely from your system :
#1) WARNING : assuming you have made a backup on your previous browser which is from Microsoft Edge, this step will be completely removing edge and its component, so If you haven’t done that, then check first what you feel is important to be saved before executing to the next stage. I am not responsible for any loss of data you have due to your negligence, I have warned you.
here are few websites that should be working to import your Microsoft Edge data to other browser you have such Google Chrome, Firefox etc.
Firefox : https://support.mozilla.org/en-US/kb/import-bookmarks-and-other-data-microsoft-edge
Google Chrome : https://support.google.com/chrome/thread/216832909/import-microsoft-edge-bookmarks-to-chrome?hl=en
for other browser, you might just wanna head straight to google search bar and type : “import bookmarks and other data from Microsoft Edge to *insert your most used browser* ”
if those sites arent working or if you are unsure how to do it, then let me know before you proceed. although its better if you can perform it manually. more accurate and more be freely to decide.
#2) Open up your browser (preferable outside of Microsoft Edge because this guide is focused on how to remove Microsoft Edge) and click on this link :
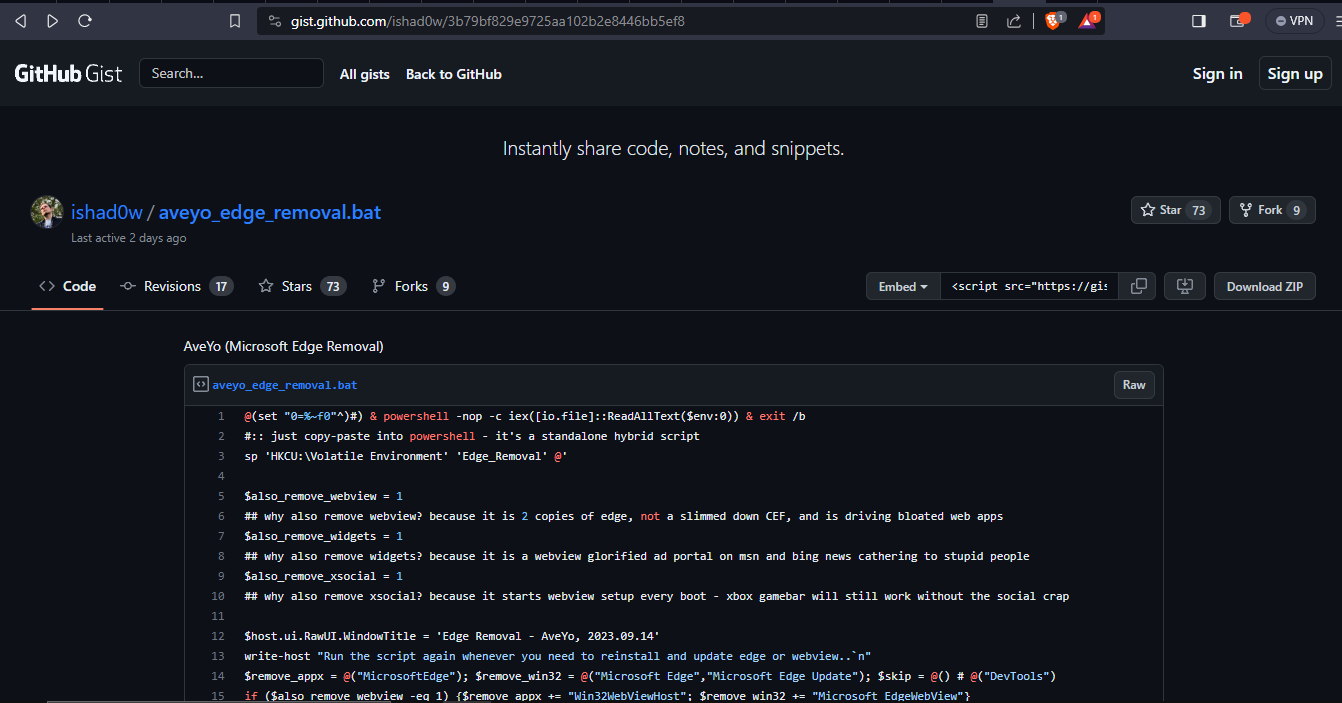
https://gist.github.com/ishad0w/3b79bf829e9725aa102b2e8446bb5ef8
once you opened/clicked the link, then it should be showed like this and click “download ZIP”
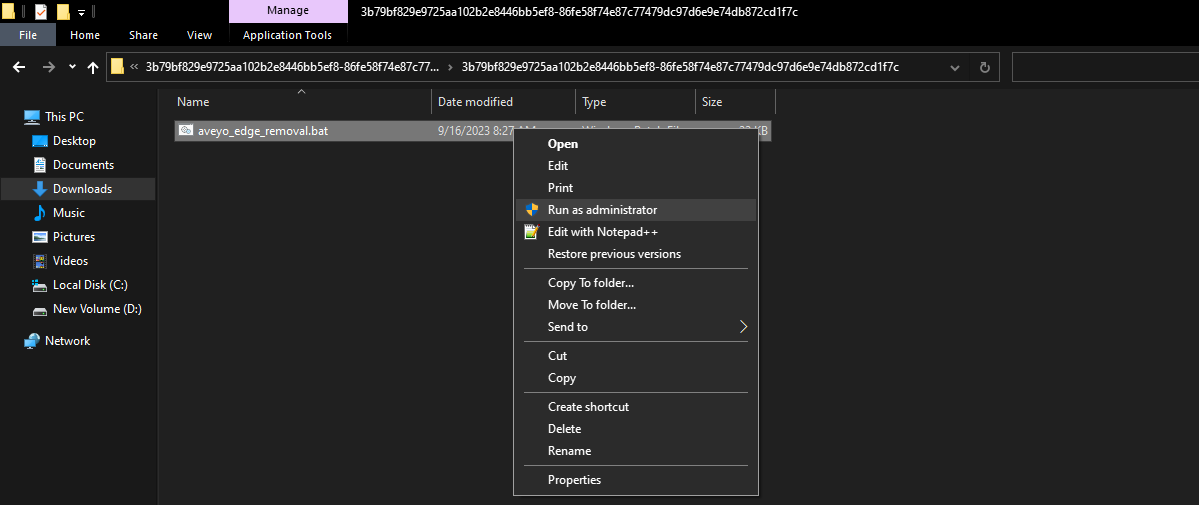
#3) Once you downloaded the file, go to “This PC”, Download foldier, navigate to your downloaded file. it should be like this.

right click to extract and just press ok. it should be extracted on the same folder you previously downloaded for and the window to auto open the extracted file should be opened as soon as the extract is completed.
#4) Once its done, open the extracted folder and find the batch file, right click on the batch file and execute “run as administrator”
#5) Wait until the process is done. the process should be appeared like this
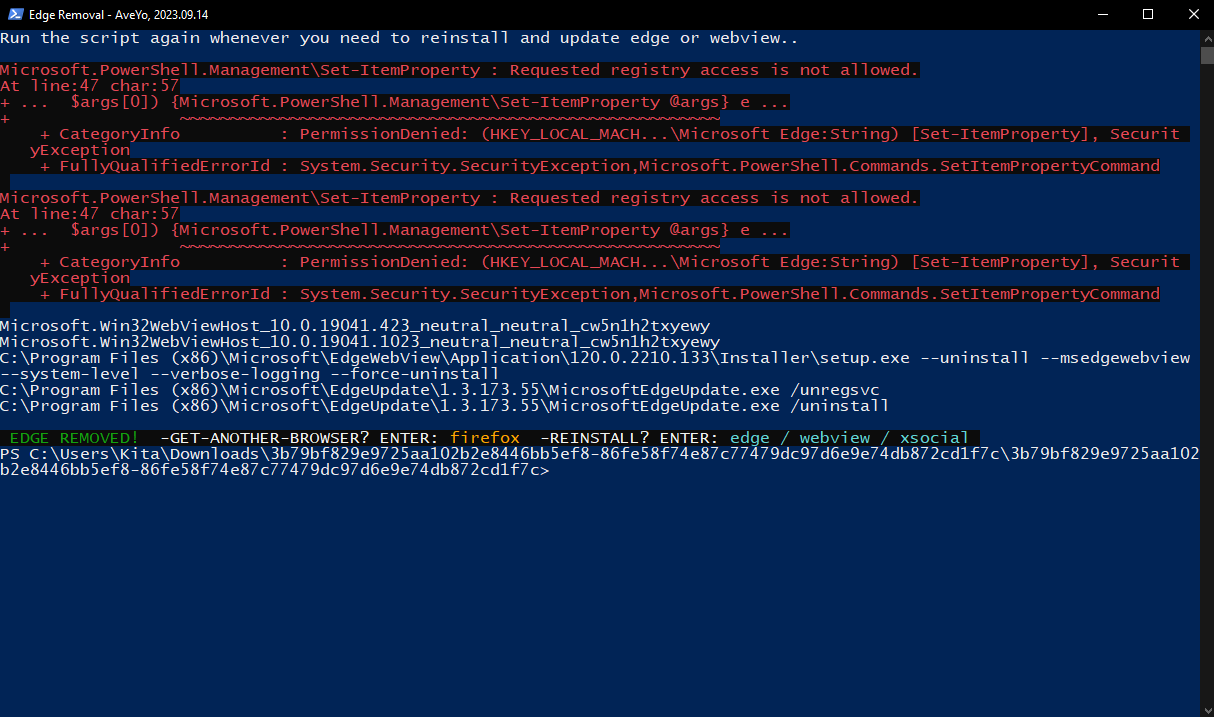
Note : the error messages were caused by the Microsoft Edge ive uninstalled on the past time. and i re-ran the executable to show it to you how it looks like. this script should be able to reinstall Microsoft Edge back by typing on what it shows on the screenshot
(EDGE REMOVED! -GET-ANOTHER-BROWSER? ENTER: firefox -REINSTALL? ENTER: edge / webview / xsocial )
By uninstalling Microsoft Edge, you understand that any of your stored data on your previous browser isc ompletely wiped and i’m not responsible of your data loss if you havent made any backups. you have been warned previously.
once this step is done, we can move to the next step.
Disable Fullscreen Optimizations
(What Is Fullscreen Optimizations?)
Fullscreen optimization is a Windows 10 feature designed to improve your PC’s performance during gaming sessions as well as run the game on a borderless full screen. When the fullscreen optimizations feature is enabled, it allows the operating system to optimize performance of games and apps when they are running in full screen mode. The fullscreen feature is enabled by default and it is available starting with Windows build 17093.
However, some users have noticed that this fullscreen optimization feature might not work properly and does not improve app performance as expected. Even worse, it causes a drop in framerate. So, they wonder whether it is possible for them to disable fullscreen optimizations Windows 10.
Therefore, in the following section, i will show you how to disable fullscreen optimizations.
#1) go to “This PC” and locate your Team Fortress 2 executable file/program (it shows as hl2.exe)
copy this location if you are having hard time to find it.
C:\Program Files (x86)\Steam\steamapps\common\Team Fortress 2 (this is default place for steam and steam games)
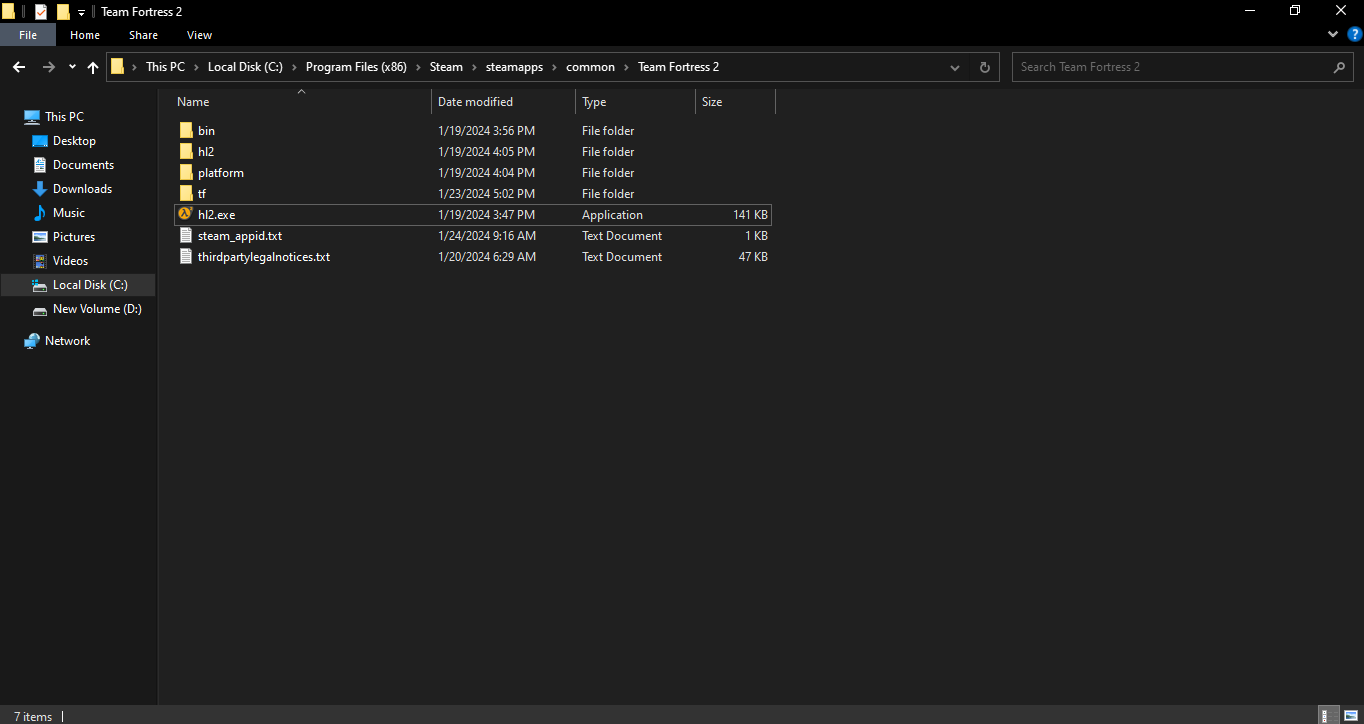
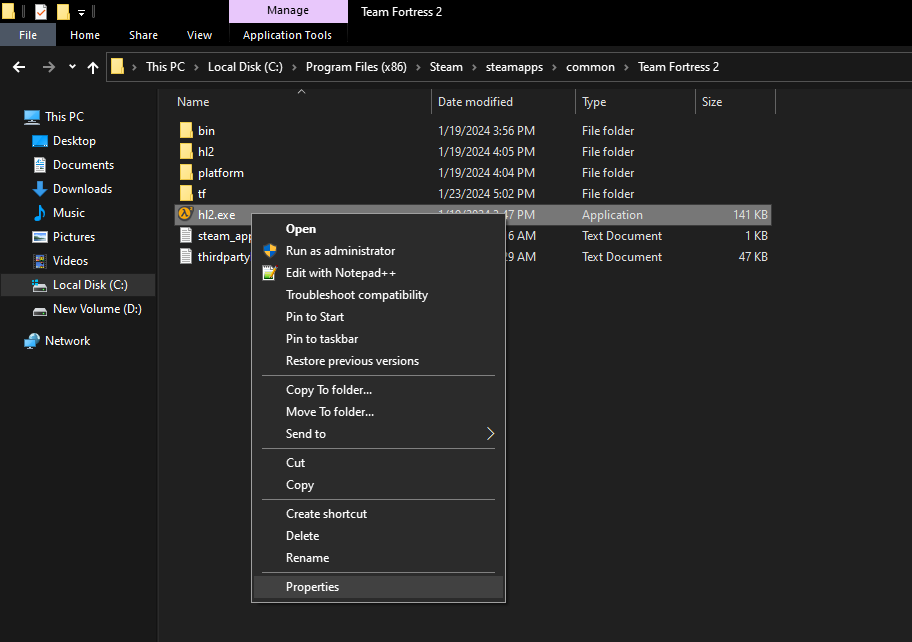
#2) Navigate to hl2.exe, right click hl2.exe and click “Properties”
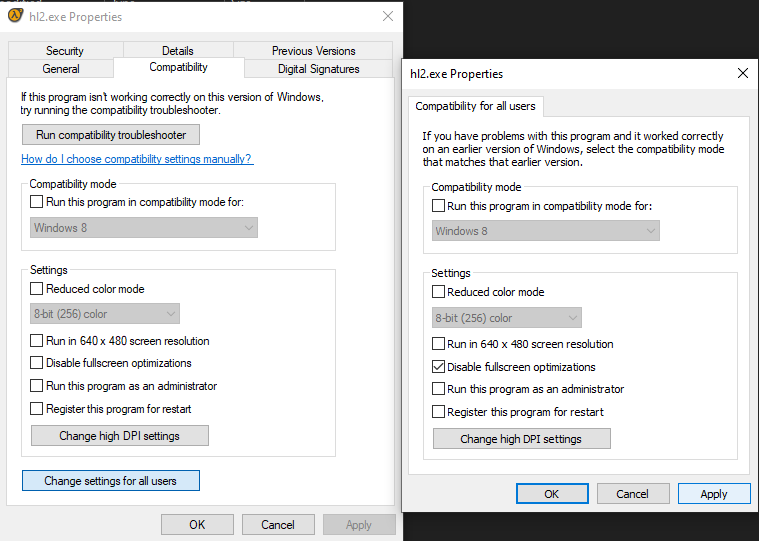
#3) on hl2.exe properties window, go to “Compatibility” tab, click “Change settings for all user”, checklist “Disable fullscreen optimizations”, hit apply and hit ok.
once you are done, we can go to the next step.
Disable Power Throttling
To optimize the power usage on devices running on battery, Windows 10 includes “Power Throttling.” It’s a feature that has been designed to leverage the power-saving capabilities found in many modern processors to limit resources for background processes efficiently while permitting them to continue to run using only a minimal amount of power.
Using the Power Throttling feature, the system can detect apps that you’re actively using and reduce the power consumption for any other process that is non-essential, resulting in up to 11 percent increase in battery savings.
The only caveat is that it doesn’t always work as expected. If you’re noticing performance issues, you can always monitor the apps that are being throttled and configure them manually to prevent them from entering into a low-power state.
In this Windows 10 guide, we’ll walk you through the steps to monitor, control, and disable the power throttling feature on your mobile device on the simple way.
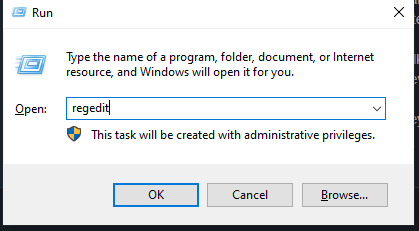
#1) Press Windows + R on your keyboard at the same time, and type “regedit” without quotation marks
#2) Locate to this registry location
HKEY_LOCAL_MACHINE\SYSTEM\CurrentControlSet\Control\Power\PowerThrottling
#3) it should be showed like this.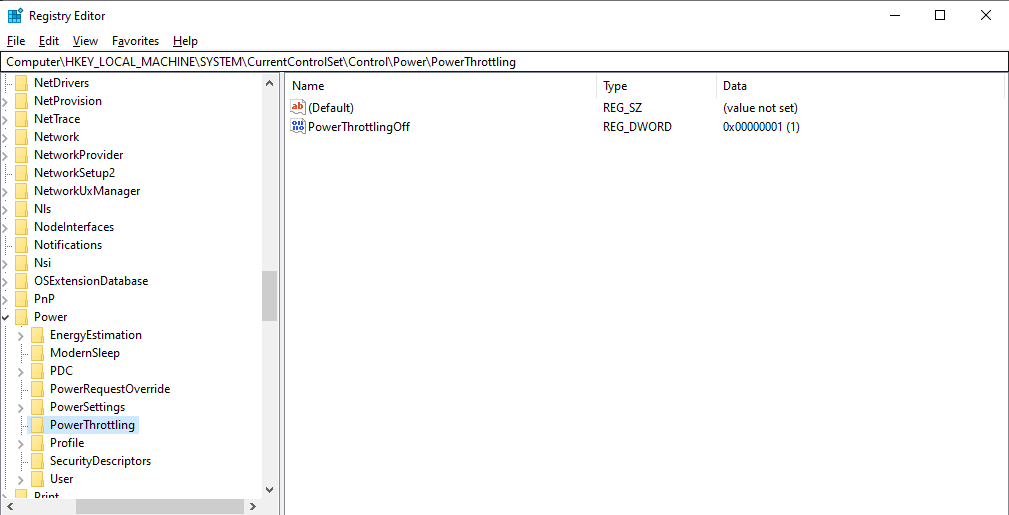
#4) if it doesnt show like screenshot above, you may need to create one by your own
-Navigate to HKEY_LOCAL_MACHINE\SYSTEM\CurrentControlSet\Control\Power
-Right-click the Power (folder) key, select New, and click on Key.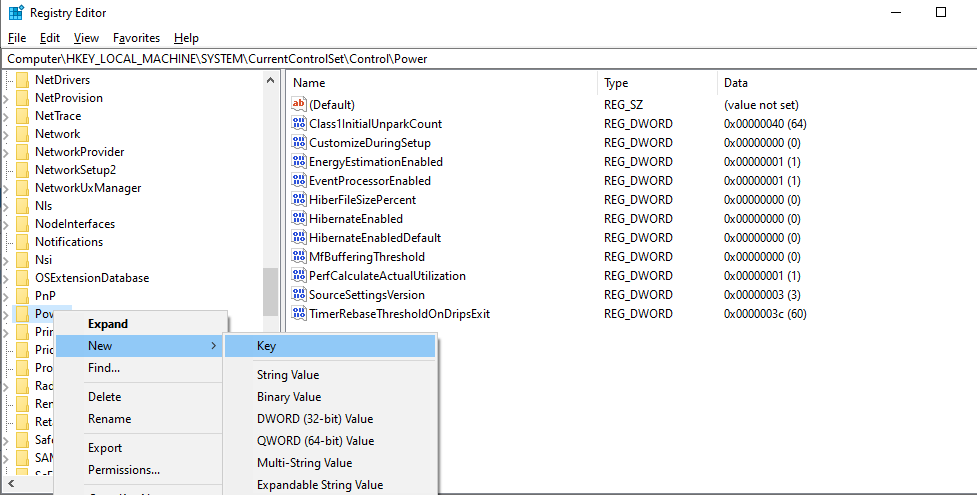
-Name the key PowerThrottling and press Enter.
-Right-click the newly created key, select New, and click on DWORD (32-bit) Value. (this case ive created it by my own)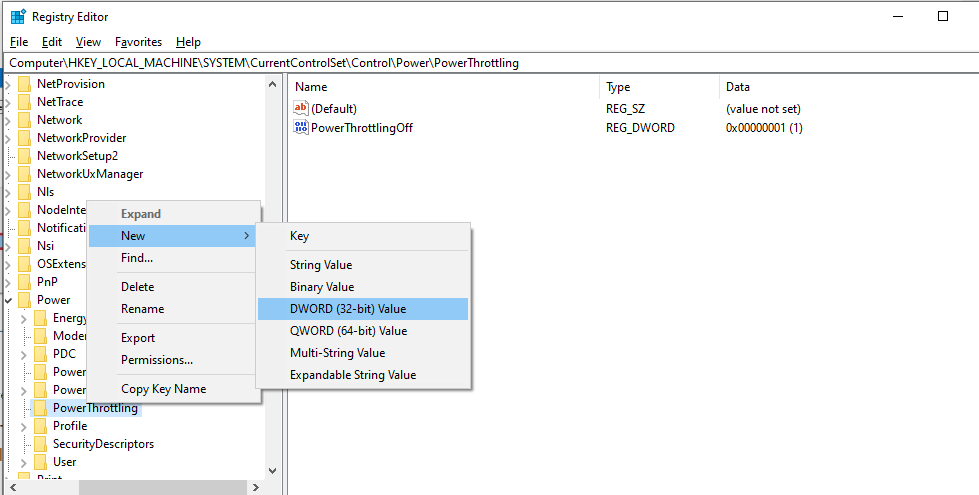
-Name the key PowerThrottlingOff and press Enter.
-Double-click the newly created DWORD and set the value from 0 to 1.
-Click the OK button and restart your device.
Disable or Uninstall Game Bar (Dont use this if you are Xbox user)
Note : if you are Xbox user, you should probably stay away from this step. you might experiencing issues when you try to run any services related to xbox features.
Out of the box, Windows 10 give you a way to record and share your games, as well as chat with your Xbox friends, manage system resources, and do all kinds of things thanks to plug-ins. All of this is available through the Xbox Game Bar, but what if you don’t care about any of these features and they’re just using up resources on your laptop? Thankfully, you can disable the Xbox Game Bar so it doesn’t bother you, at least to some extent. Here’s how.
In Windows 10, it’s a lot easier to simply disable the Xbox Game Bar altogether.
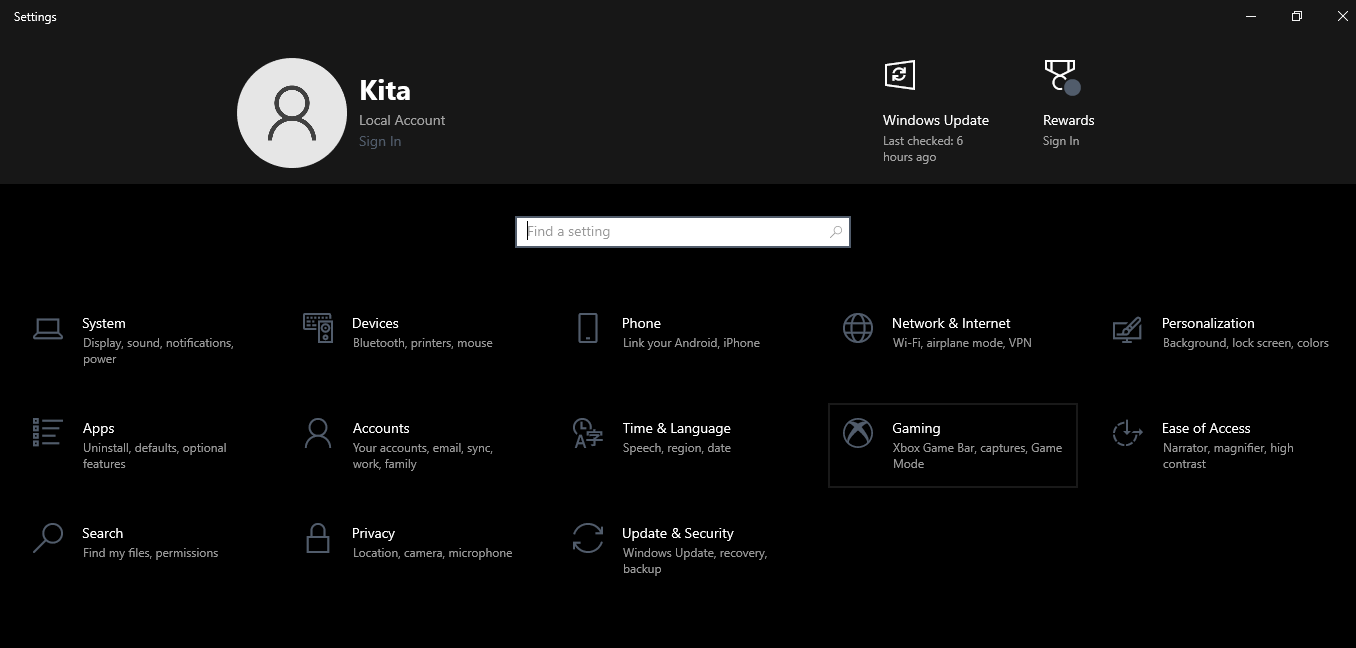
#1) Open the Settings app located in start menu, Settings
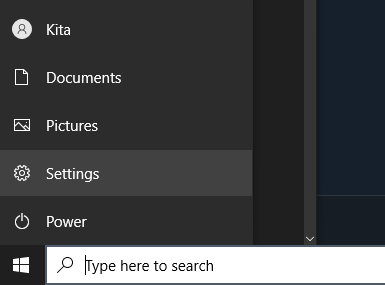
#2) Choose the Gaming section.
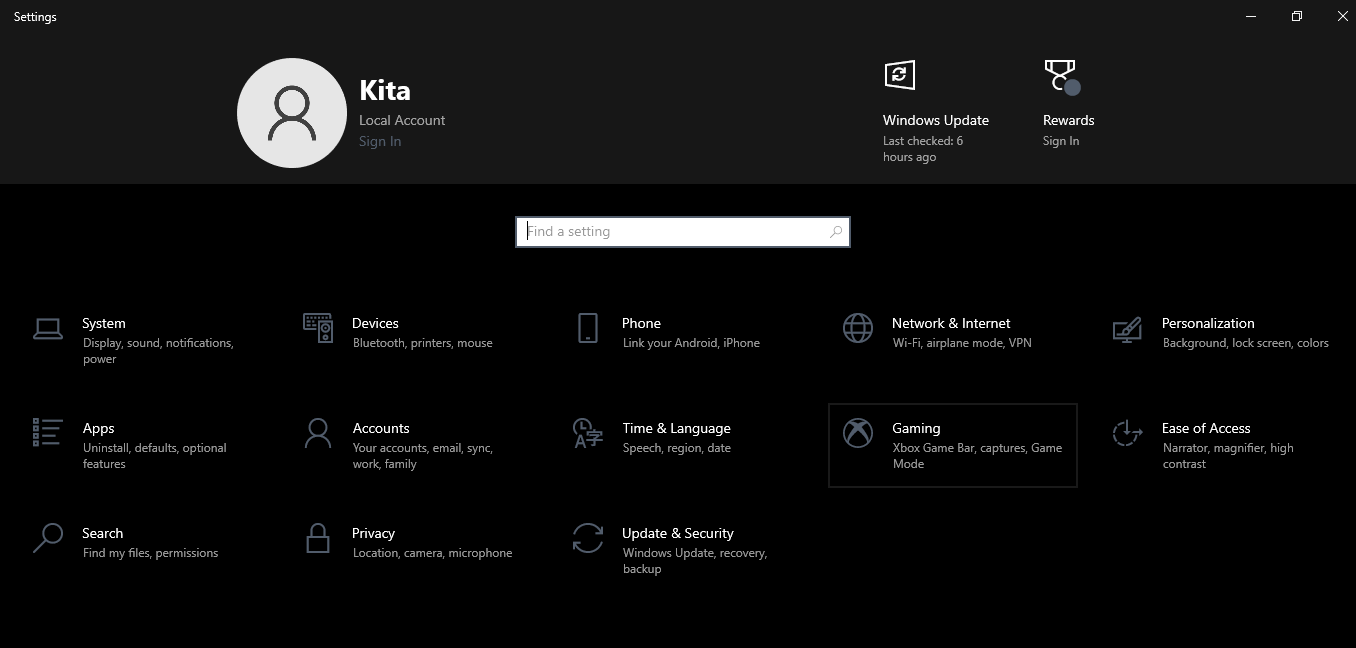
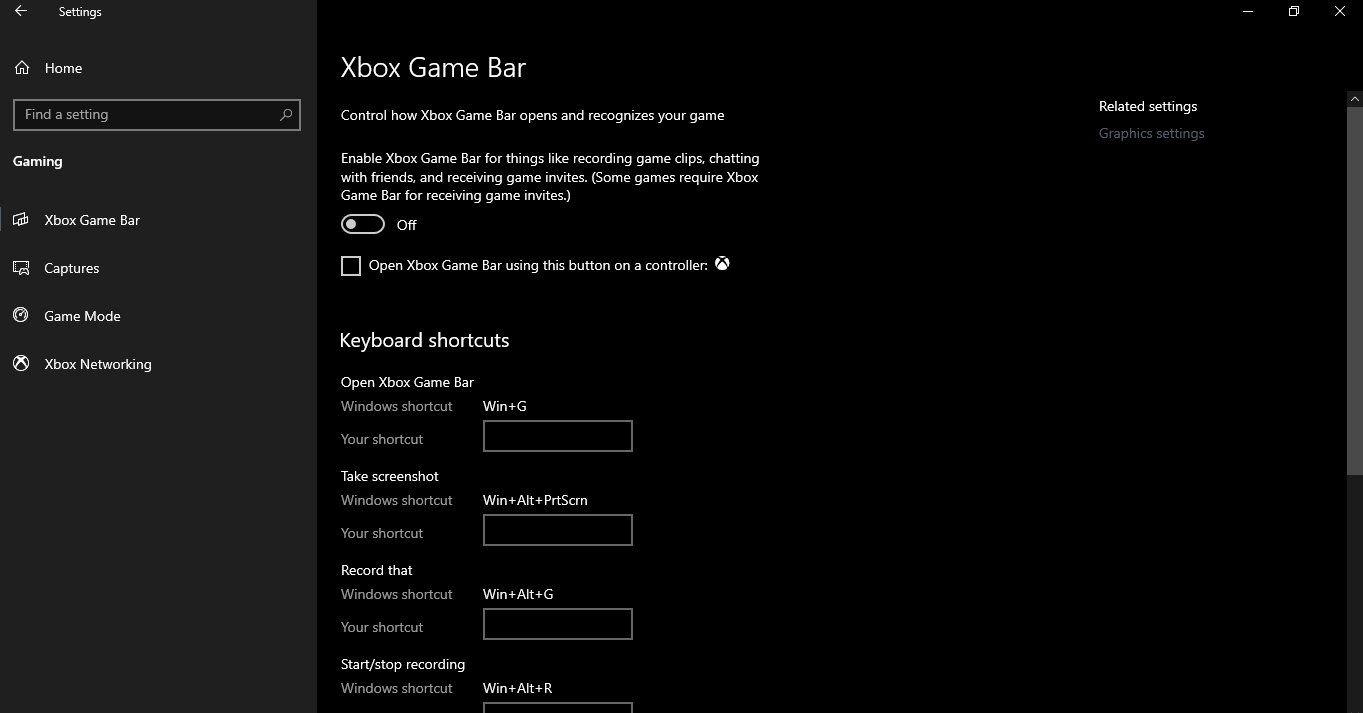
#3) Turn off the toggle that starts with Enable Xbox Game Bar.
If you want to uninstall Game Bar completely
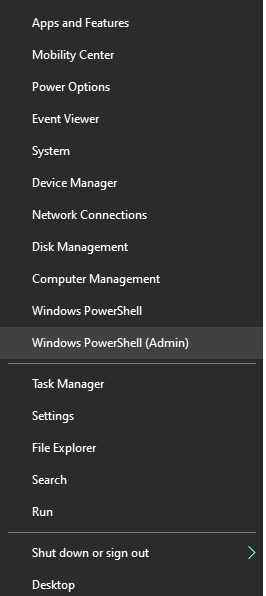
#1) Open Windows PowerShell as admin (you can find it in the right click on your start menu).
#2) Enter the following command and press Enter.
Get-AppxPackage Microsoft.XboxGamingOverlay | Remove-AppxPackage
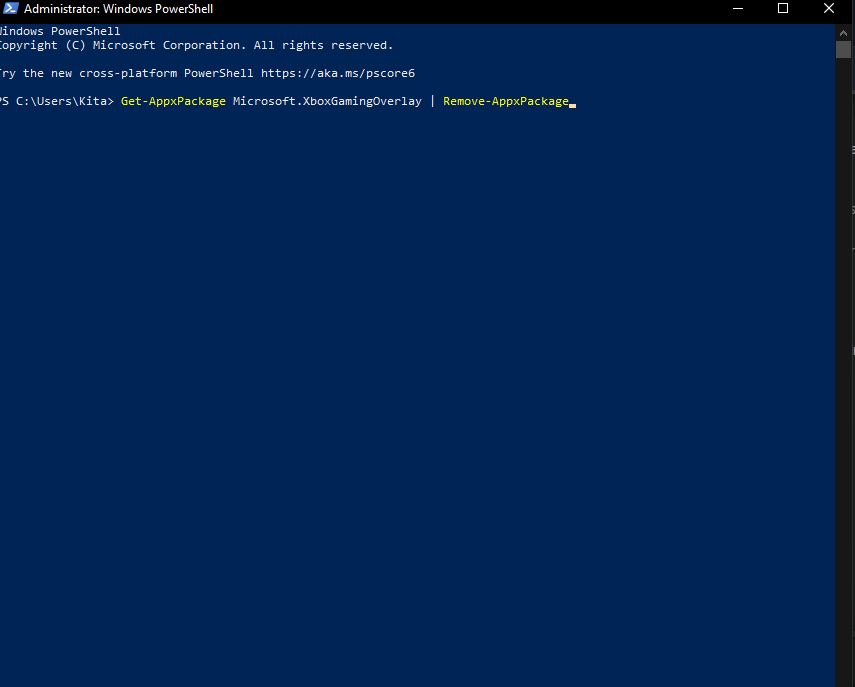
wait until the process is done, once its done, we may go to next step.
Download MemReduct program
The program used undocumented internal system features (Native API) to clear system cache (system working set, working set, standby page lists, modified page lists) with variable result ~10-50%. Application it is compatible with Windows XP SP3 and higher operating systems, but some general features available only since Windows Vista.
You can download either the installer or portable version. For correct working you are require administrator rights.
https://github.com/henrypp/memreduct/releases/download/v.3.4/memreduct-3.4-setup.exe
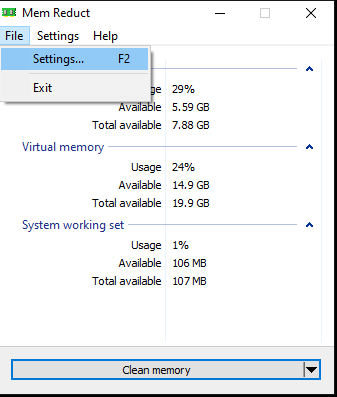
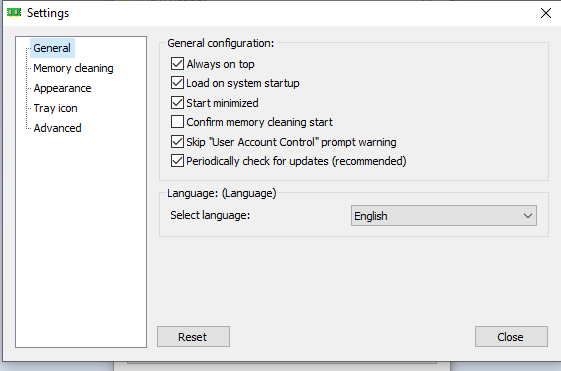
once its downloaded, navigate to your “This PC”, Download folder, execute the installer normally. and here are few settings you should set after installing memreduct you need to open your memreduct and go to this setting displayed on screenshots under.
Conclusion
And that wraps up our share on “Maximizing TF2 Performance: The Ultimate Windows Settings Guide”. If you have any additional insights or tips to contribute, don’t hesitate to drop a comment below. For a more in-depth read, you can refer to the original article here by Ikuyo Kita, who deserves all the credit. Happy gaming!
