This article will cover how to stream games from the virtual reality game Pavlov VR to Twitch using OBS. If you want to show off your gaming skills on Twitch or just want to share your gaming with others, this guide will help you do so!
Guide Info
at the time of writing this guide, the latest release of obs is version 29.1.3.
below is a link to obs on steam:
https://store.steampowered.com/app/1905180/OBS_Studio/
…but u can also download it directly from their website: obsproject.com
Prerequisites
- updated drivers
- updated steamvr (dont use the beta, unless your hmd or operating system requires it)
- updated obs
- at least one 16:9-monitor
Game Performance
to make sure your game runs fine i recommend taking a look at this other guide right there:
https://steamcommunity.com/sharedfiles/filedetails/?id=3068009494
Enable & Configure Display VR View
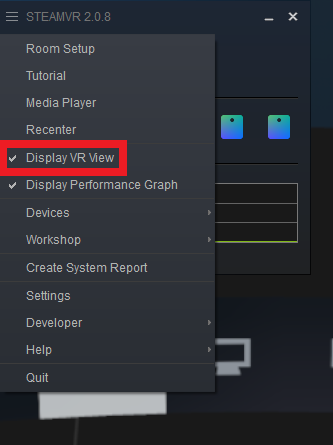
this spawns a new window, which will by default be attached below the steamvr window. in order to stream your vr view properly do the following:
- detach the vr view window from the steamvr window
- make the vr view fullscreen (by using the button for it on the top right corner or by pressing ALT+ENTER while its in focus)
- right-click into it somewhere, then select one of the “both eyes”-options (see image below; i am right-eye-dominant, so i select right eye view)
this will be the window to capture via obs later on.
Twitch’s Recommendations
https://help.twitch.tv/s/article/broadcasting-guidelines
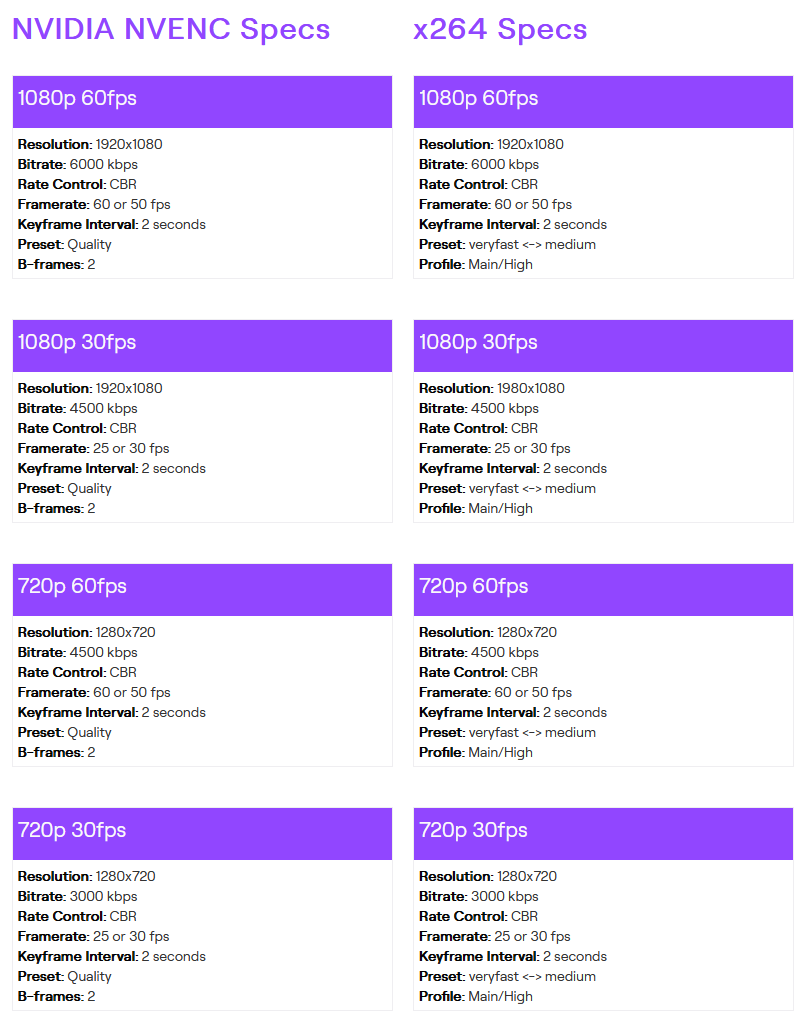
this is what it boils down to:
OBS Configuration
the key aspects of every streams configuration are those:
- resolution (and therefore aspect ratio)
- frames per second
- encoder
- bitrate (and rate control mode)
the resolution should match whatever it is you want to stream. if its fullscreen gameplay, captured from a 16:9-monitor for example, one would pick a 16:9 resolution like 1920×1080 or 1280×720.
twitch is more or less limiting the resolution (via the bitrate; more on that later) to an effective maximum of 1920×1080 (unless you are part the twitch partner program or whatever they call it which allows to stream with higher bitrates).
generally speaking: the higher the resolution, the more processing power and upload bandwidth (bitrate) will be required (see image in previous section; more on that later).
frames per second is another very important aspect. for fast-moving content (like fps gameplay for example) one would always prefer higher fps. the 3 most common values used for fps are 30, 48 and 60. and of course: the more frames, the more processing power and upload bandwidth (bitrate) will be required (again: see image in previous section; more on that later).
the encoder determines wether the processing power needed to “make” your stream (with the given resolution and fps) comes from your cpu or your gpu.
the x264 encoder uses only the cpu and is fully sufficient for streaming to twitch, quality-wise, but it does come with a noticeable pricetag in the form of processing power requirement. if your cpu is already struggling this might be a problem when streaming high-res/high-fps content.
nvidia gpu’s offer an encoder called “nvenc” which uses the gpu, does a better job in terms of quality and does not use a ton of gpu processing power. if your gpu isnt already fed up with running a game or whatever else, this is usually the better choice over x264.
amd gpu’s offer an encoder called “hw x264” which obviously also uses the gpu and also does a better job in terms of quality and processing power requirements. same here: if your gpu isnt already fed up with running a game, then this is usually the better choice over regular x264.
and finally, the bitrate:
- depends on your chosen resolution and fps
- requires upload bandwidth
- twitch has a hard limit at 8000kbps
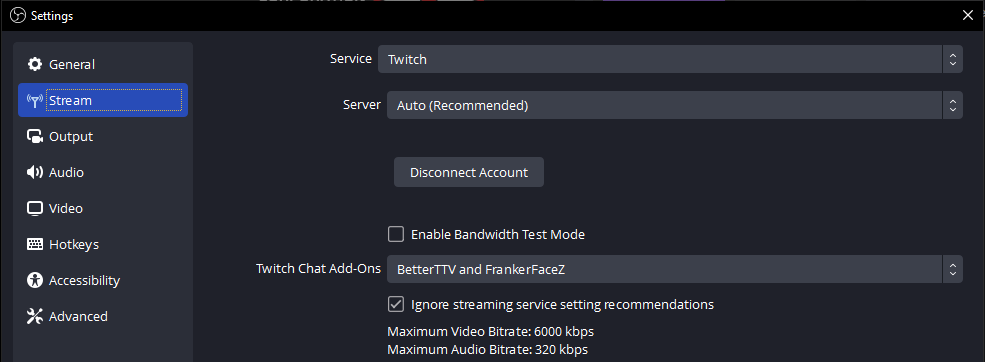
the recommendations from twitch can be found in the previous section, but OBS has a checkbox called “ignore streaming service settings recommendations”, which allows everyone to use the 8000kbps-limit, instead of the regular 6000kbps-limit OBS and other software will follow by default.
the following is a list of bitrates and resolutions/fps that i would recommend for fast-moving content:
- 8000kbps 1920×1080 60fps
- 7000kbps 1920×1080 48fps
- 6000kbps 1280×720 60fps
- 4500kbps 1280×720 48fps
- 3000kbps 1280×720 30fps
to find out what upload bandwidth you have (stable, not peak), visit the following website and run their test:
https://www.speedtest.net
the result in this example here (see image below) shows “43.33Mbps” upload speed which translates to ~44000 kbps of possible bitrate.

as a rule of thumb i recommend to stay below 50% of your maximum available upload (because other stuff in your network will have to use the same upload bandwidth, for example the game you might be streaming).
and with this, you basically have everything you need to configure your stream.
OBS Configuration Screenshots
video:

stream:
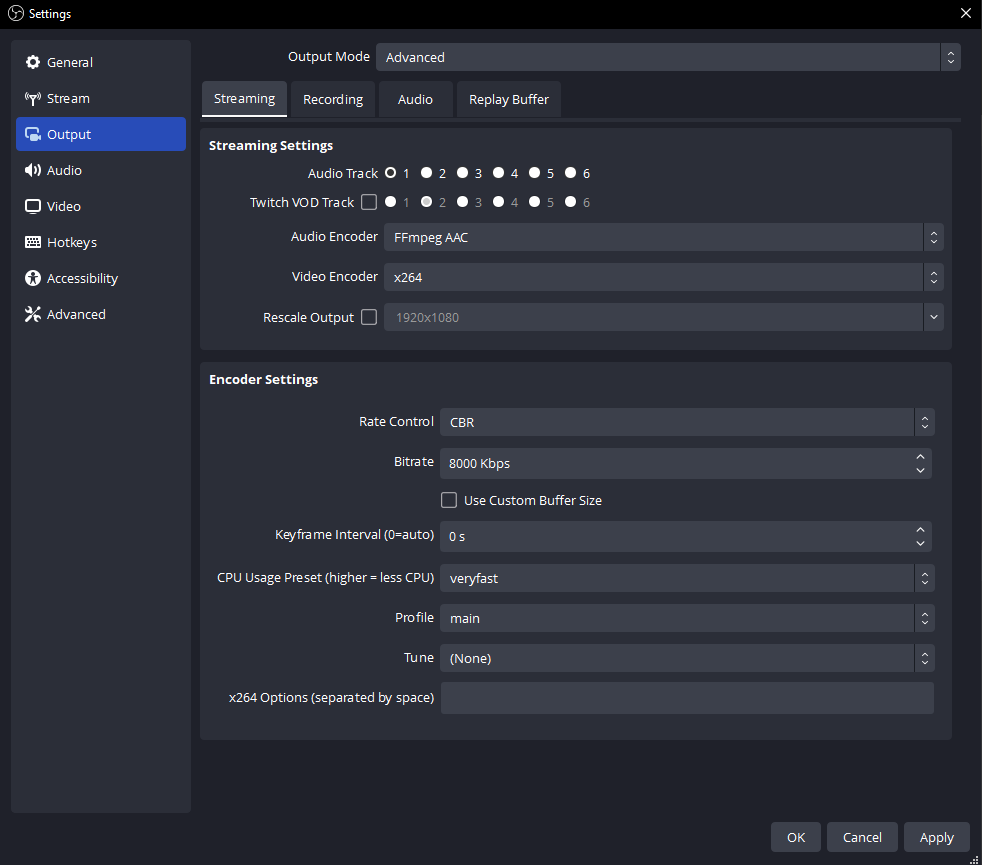
output -> streaming (with x264 encoder):
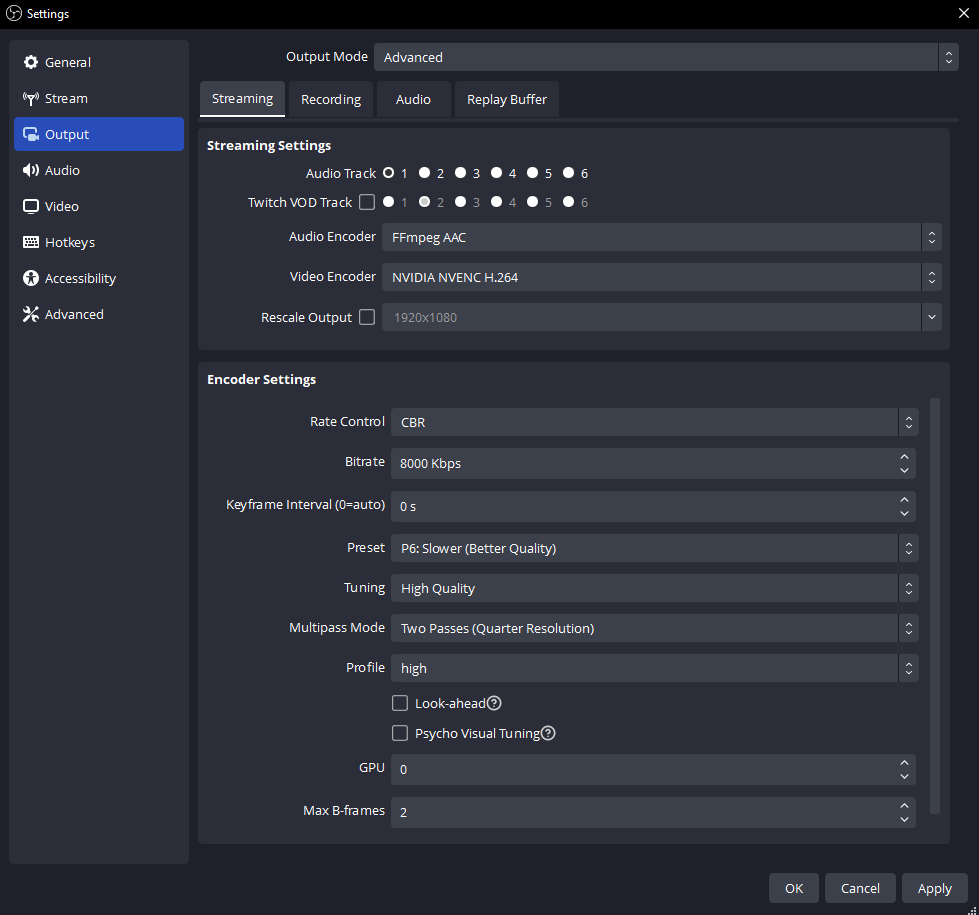
output -> streaming (with nvenc encoder):
output -> audio:

Adding Content (Sources)
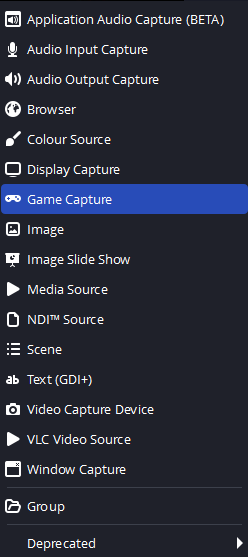
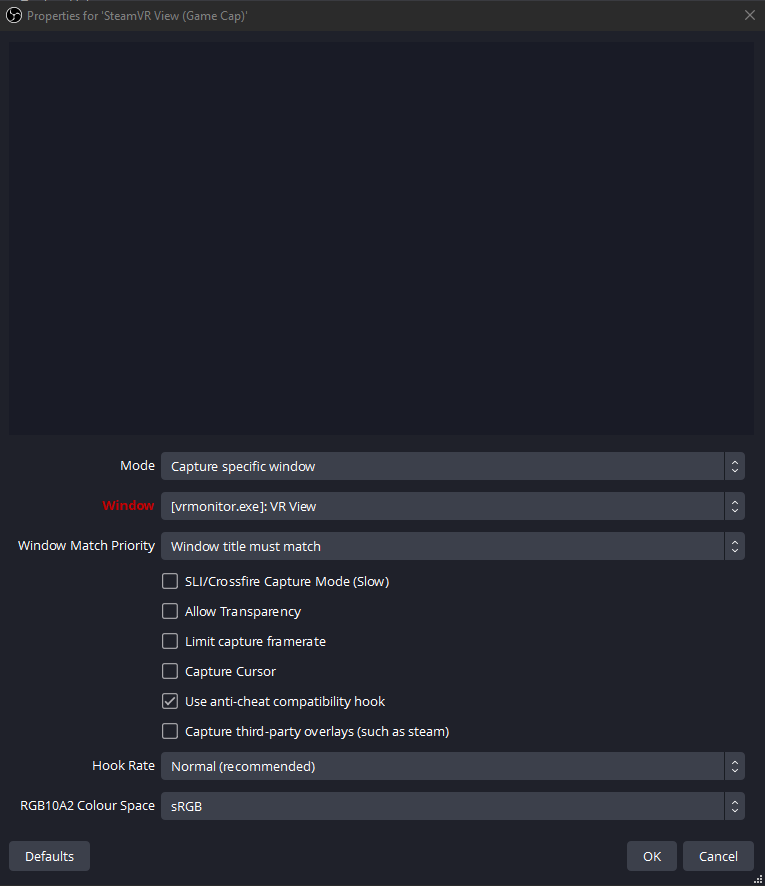
…and its properties look like this (see image):
thats it 🙂
Finetune OBS Stream Quality for Performance
to lower the required processing power, the first thing to question is wether you’re using the right encoder or not. if you are using the x264 encoder, which uses the cpu, maybe give nvidia’s or amd’s encoder a try.
the next thing to try in order to lower the required processing power is to lower the encoder quality settings (or jump straight to lowering the resolution and fps).
for the cpu encoder x264 there are 3 options: usage preset, profile and tune. i’d recommend to not use tune at all, to use “main” as the profile and to pick a usage preset that results in “good enough” video quality (needs testing; default is “faster”).
the gpu encoders have more and different options. i dont have an amd graphics card, so i can’t actually make any recommendations there unfortunately… with nvidia’s nvenc encoder are these settings available: preset, tuning, multipass mode, profile, look-ahead and psycho-visual-tuning. i’d recommend to not use look-ahead and psycho-visual-tuning, to keep multipass at “two passes (quarter resolution)” and then select appropriate values for the remaining options which result in a “good enough” video quality in your eyes (needs testing; defaults are “p5: slow (good quality)” for preset, “high quality” for tuning and “high” for profile).
if thats no solution (or you already lowered everything as far you are willing to), whats left to adjust are the fps and then the resolution of your stream. streaming in 720p, but with a decent amount of frames (48 or 60) commonly results in a better video quality than 1080p with 30 fps (for fast-moving content like fps games).
Tips & Tricks
- to avoid stream-sniping one can enable a delay in settings -> advanced -> stream delay
- i recommend to disable all default audio input/outputs and to replace them with the equivalent obs sources (which results in exactly 1 input and exactly 1 output)
- for audio input sources (microphone) it can be nice to introduce a noise gate (via right-click on the source -> filters), which prevents background noise being captured
- if possible, avoid rescaling your video resolution at any point, because this can be pretty resource-heavy; one option for this is in settings -> video -> downscale filter, the other is in settings -> output -> streaming (and the latter should be heavier on resources, but better in quality from what i understand)
- some integrations have an option called “low-latency mode”, which is meant to be used for real-time-content, like chatting with viewers, and it comes at the direct cost of image quality, so don’t use this unless you really need your stream to be as real-time as possible
Bonus: NDI Plugin
the obs plugin for ndi can be downloaded there:
https://github.com/obs-ndi/obs-ndi/releases
however, im not gonna go into detail how this is configured in this guide. you can easily find tutorials for that on youtube (and i promise the configuration is fairly simple).
And that wraps up our share on SteamVR Pavlov VR Twitch Streaming with OBS. If you have any additional insights or tips to contribute, don’t hesitate to drop a comment below. For a more in-depth read, you can refer to the original article here by calmlikeabomb and 1 collaborators, who deserves all the credit. Happy gaming!
